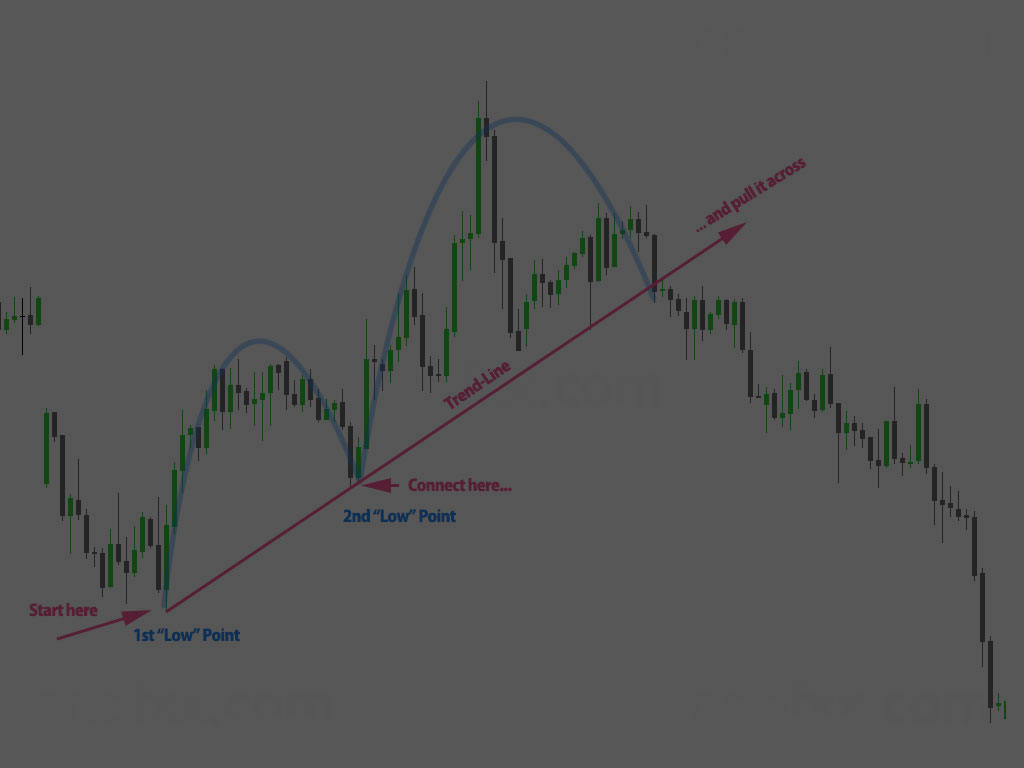
📈How to Master Support and Resistance Trading Strategy with 15 Great Examples

What are Support and Resistance Zones, and why are they critical for trading?
Support and Resistance are like the rules of a game that help traders figure out how prices might move in the stock market. Think of support as a safety net. It’s like the floor in a game of lava, where the price of a stock doesn’t usually fall below.
This is where many buyers think, “Hey, this is a great price to buy!” and help push the price back up. On the flip side, resistance is like a ceiling. When prices go up to this level, they often hit their head and can’t go any higher because many sellers jump in thinking, “This is a great time to cash out!” this stops the price from climbing further.
In this tutorial, we introduce the basics of identifying support and resistance zones, how to draw them, utilise them properly in your trading strategy, and provide you examples of trading with support zones in a bullish trend, and using resistance zones in a bearish trend.
Let’s get started!
Difficulty: 6/10
Basic Ground Rules
Price is always under the Resistance Zone.
Price is always above the Support Zone.
They get weaker over time.
Price can, and often will, break past these zones in a ‘fake out’.
You should always use them in combination with other factors (e.g., Fibonacci Levels, Price Structure)
It’s not a line or specific price. It’s a zone. It’s a range.
Let’s start with a straightforward example with outline illustrations. Let’s look at this price uptrend.
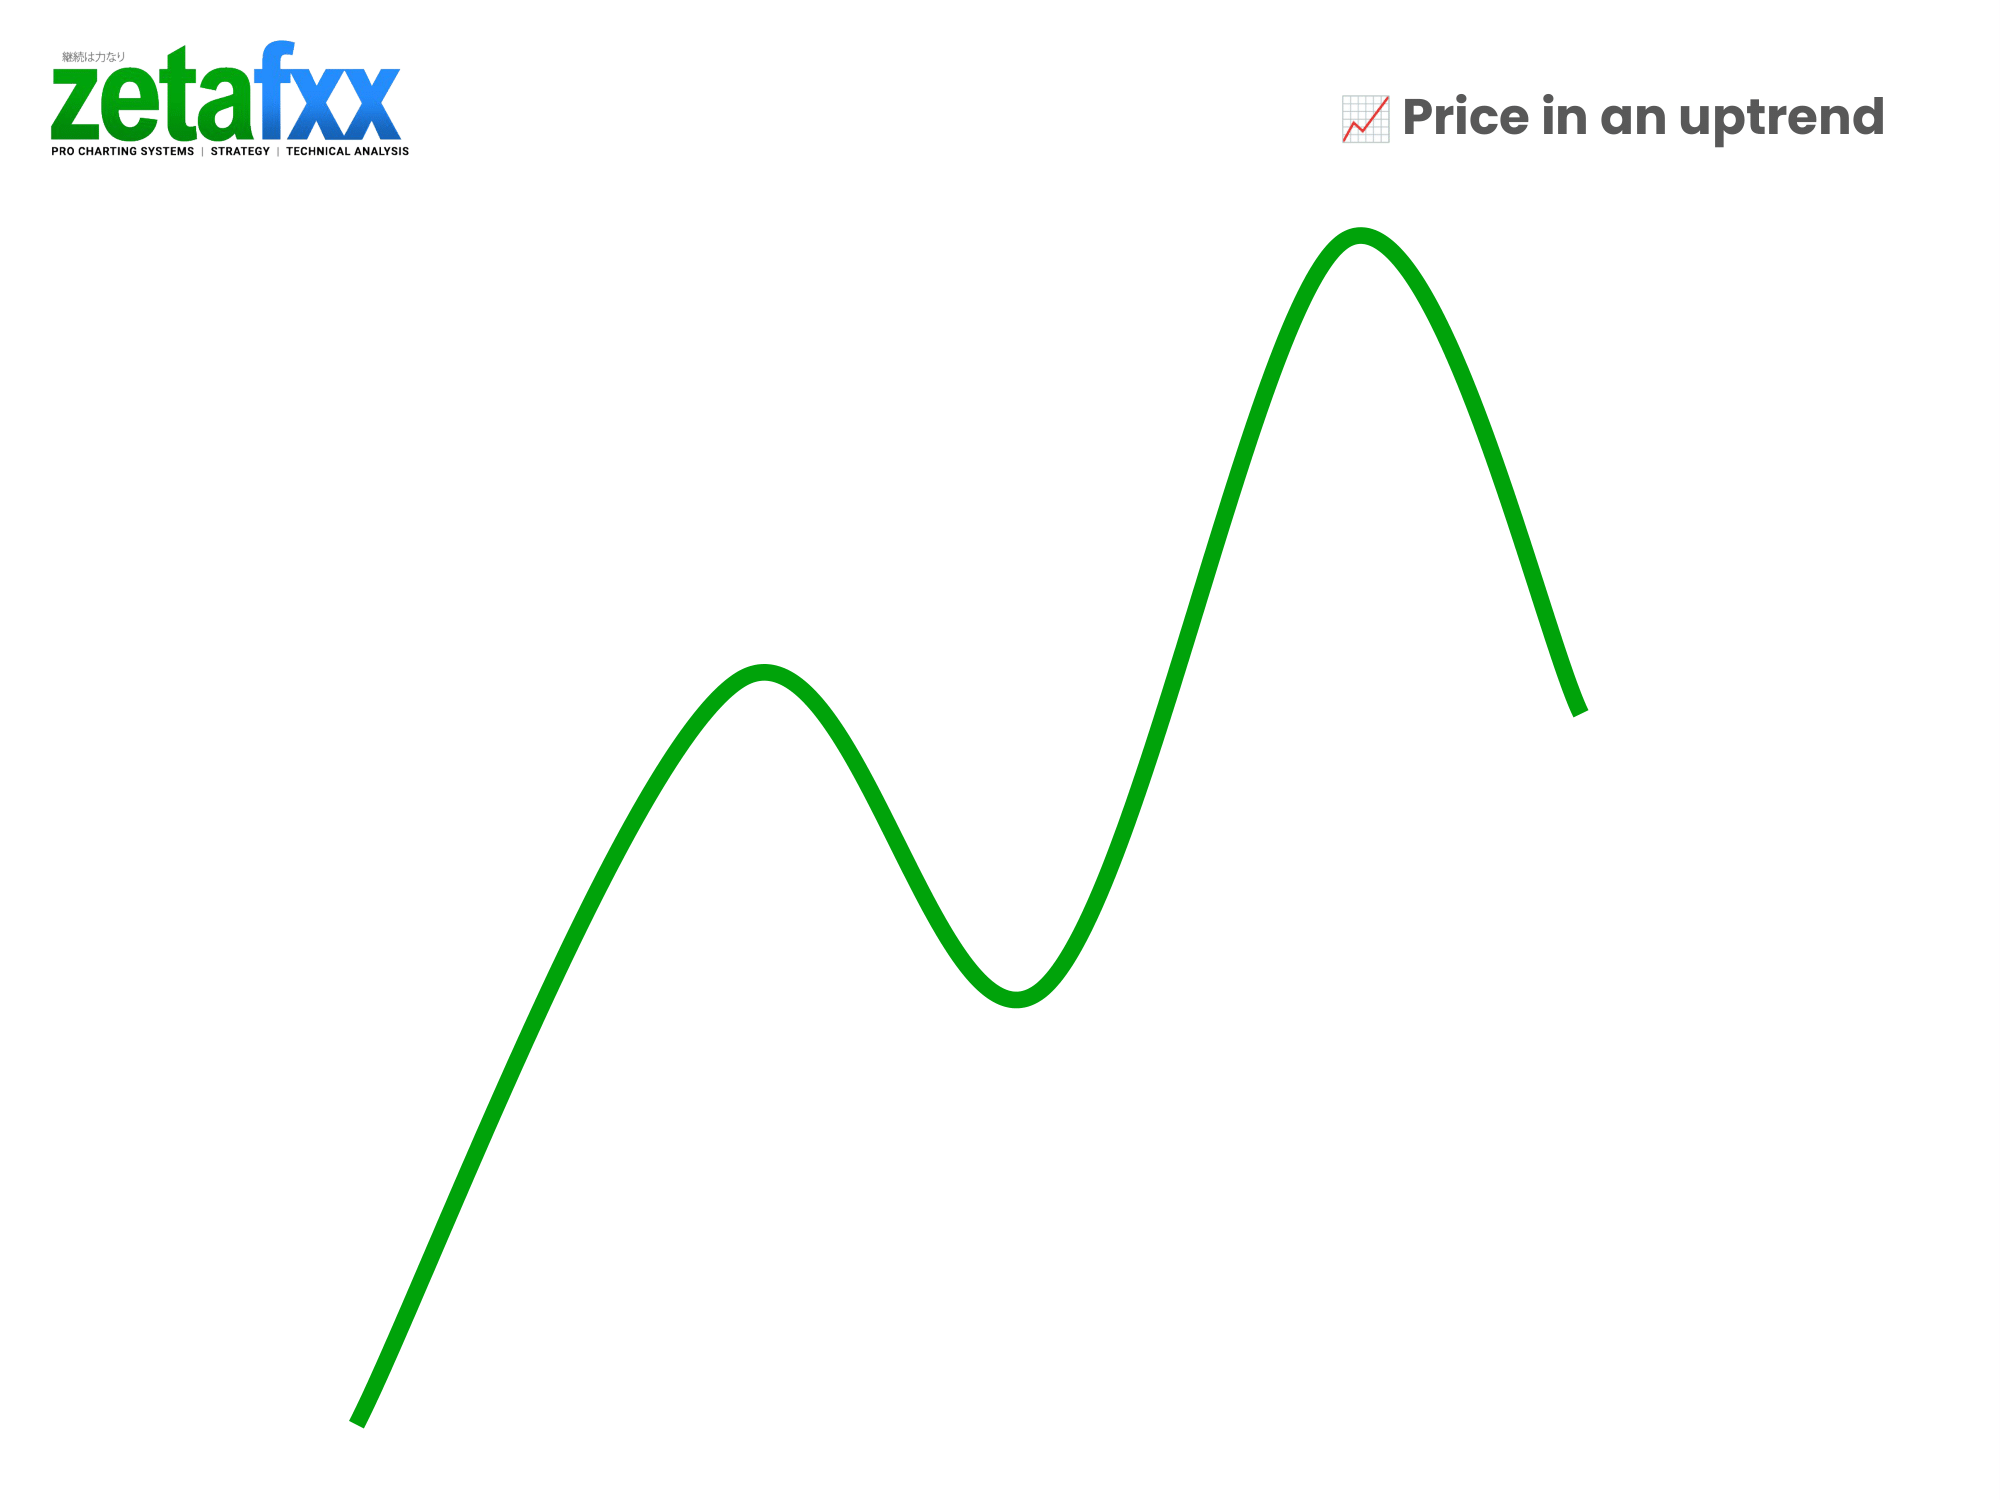
- You identify swing points in the uptrend.

2. You highlight the general area at these major swing points.
A major swing point above the price is considered a resistance zone.
A major swing point below the price is considered a support zone.
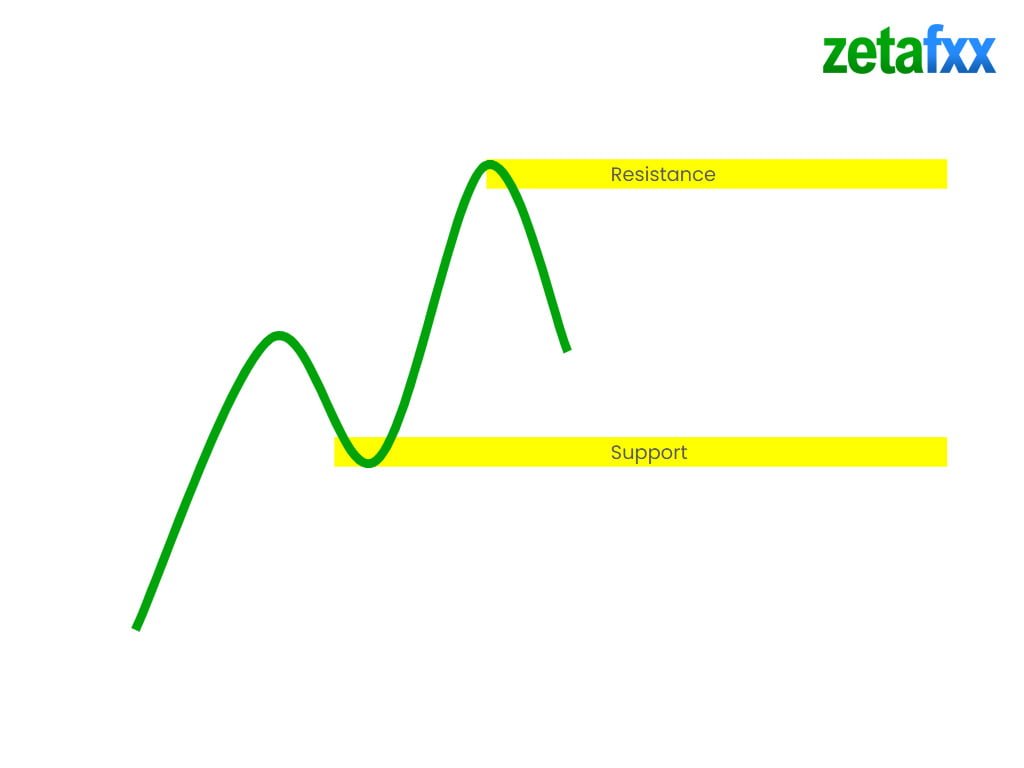
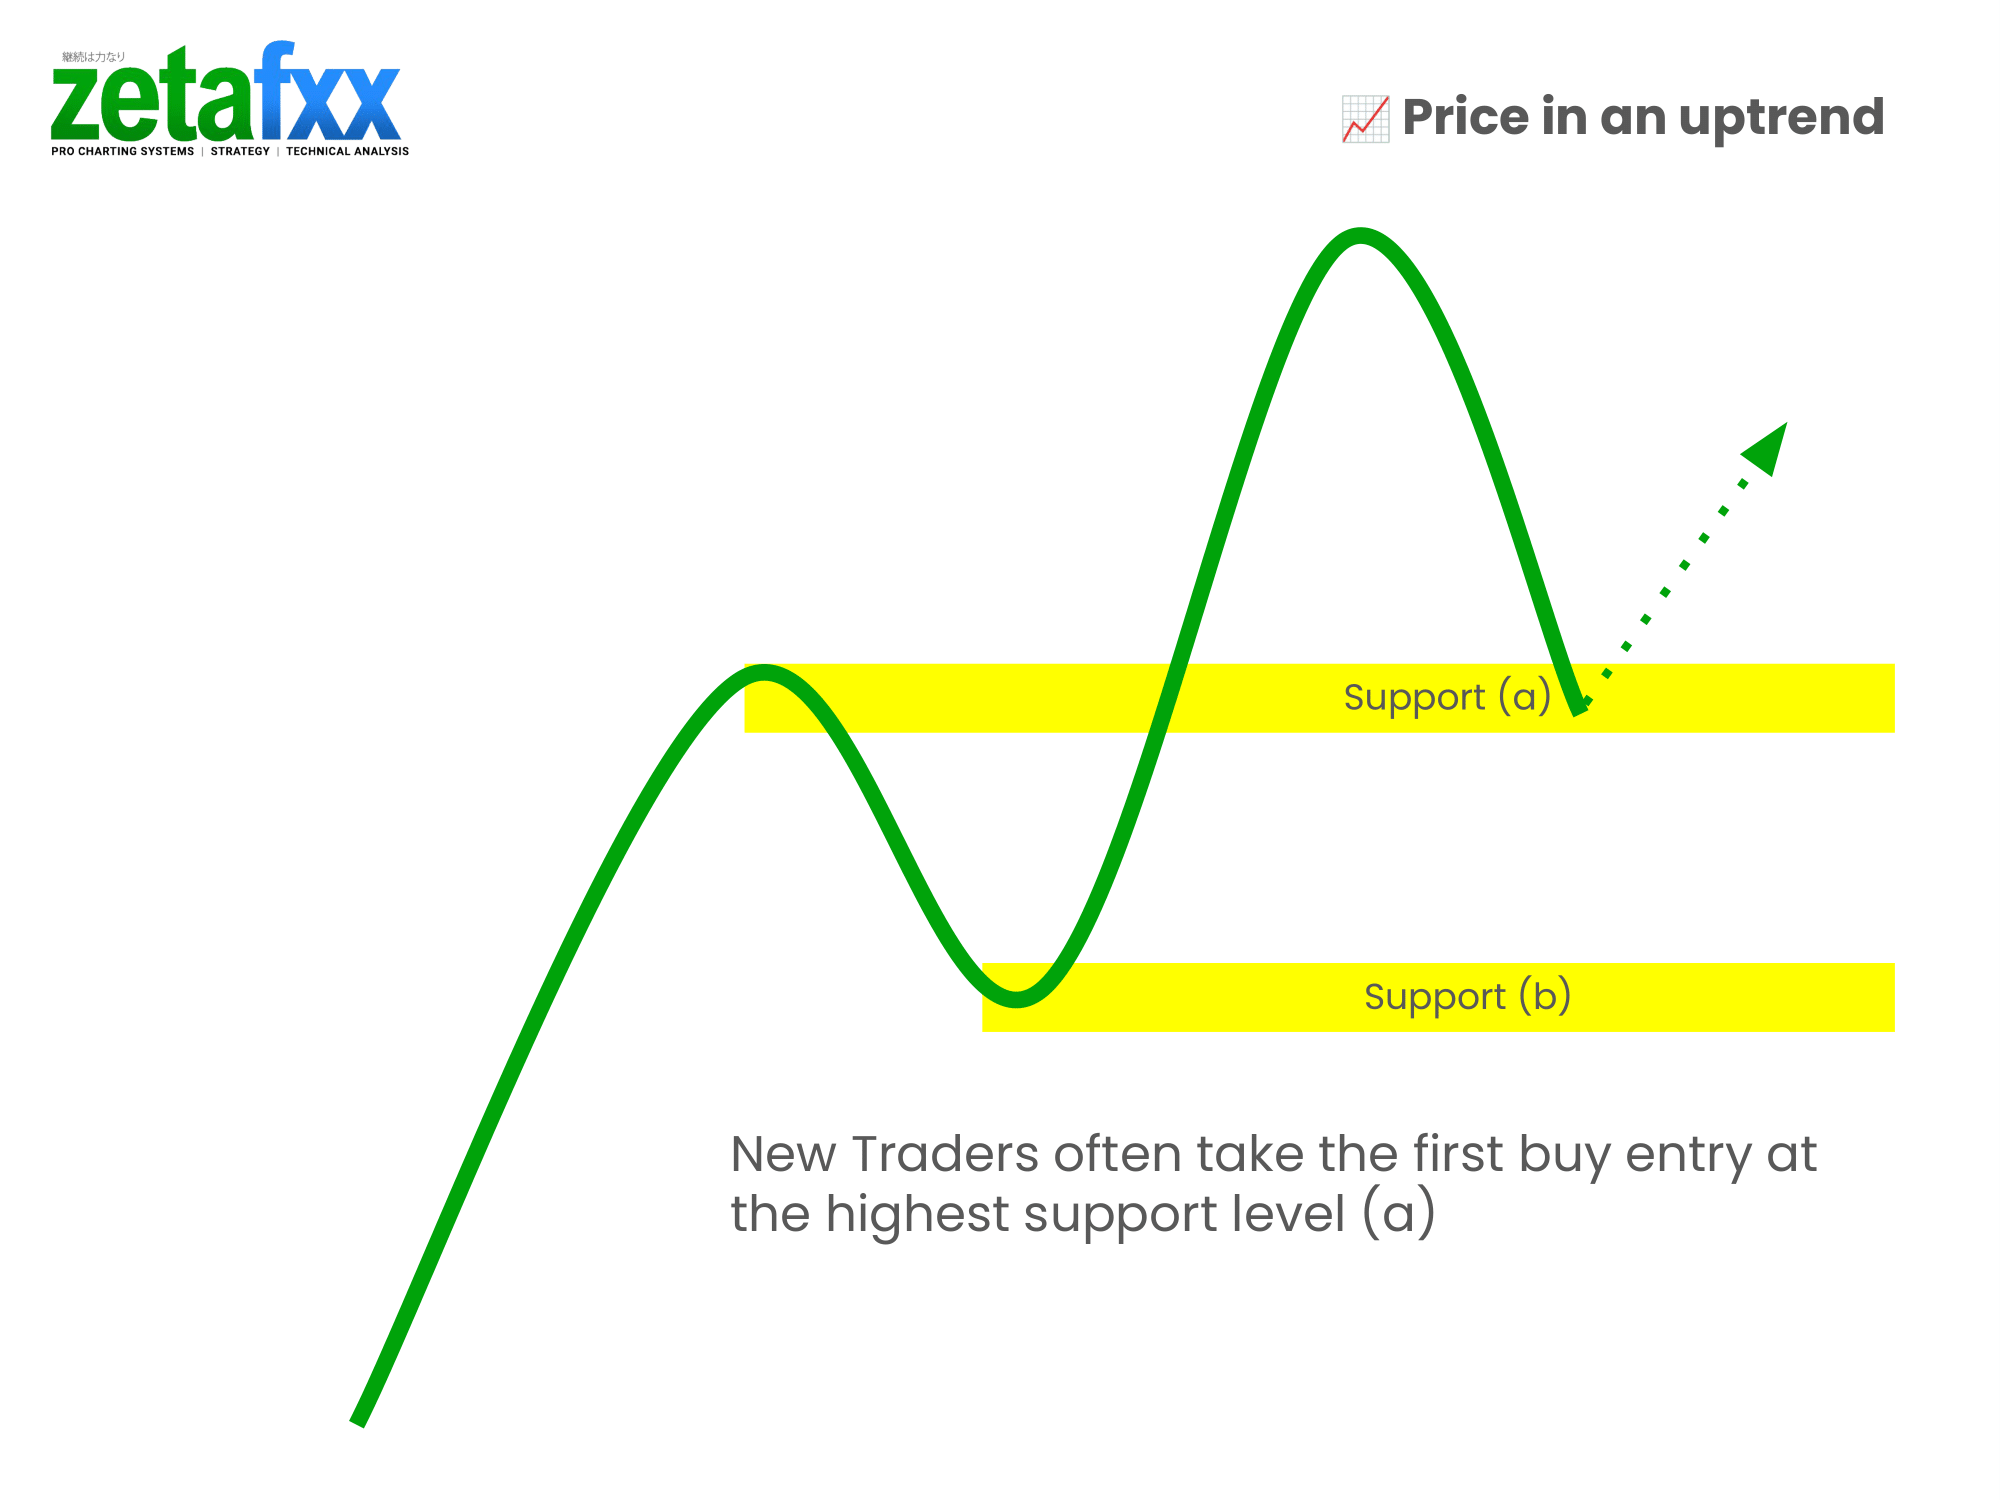
In an uptrend, price generally ‘bounces’ or reacts at the support zone.
However, in most cases, price tends to head to the lower support zones like below!

Example of price in a downtrend and how we identify resistance zones.

In this example, we can use these swing points to create some reference points for the resistance zones.
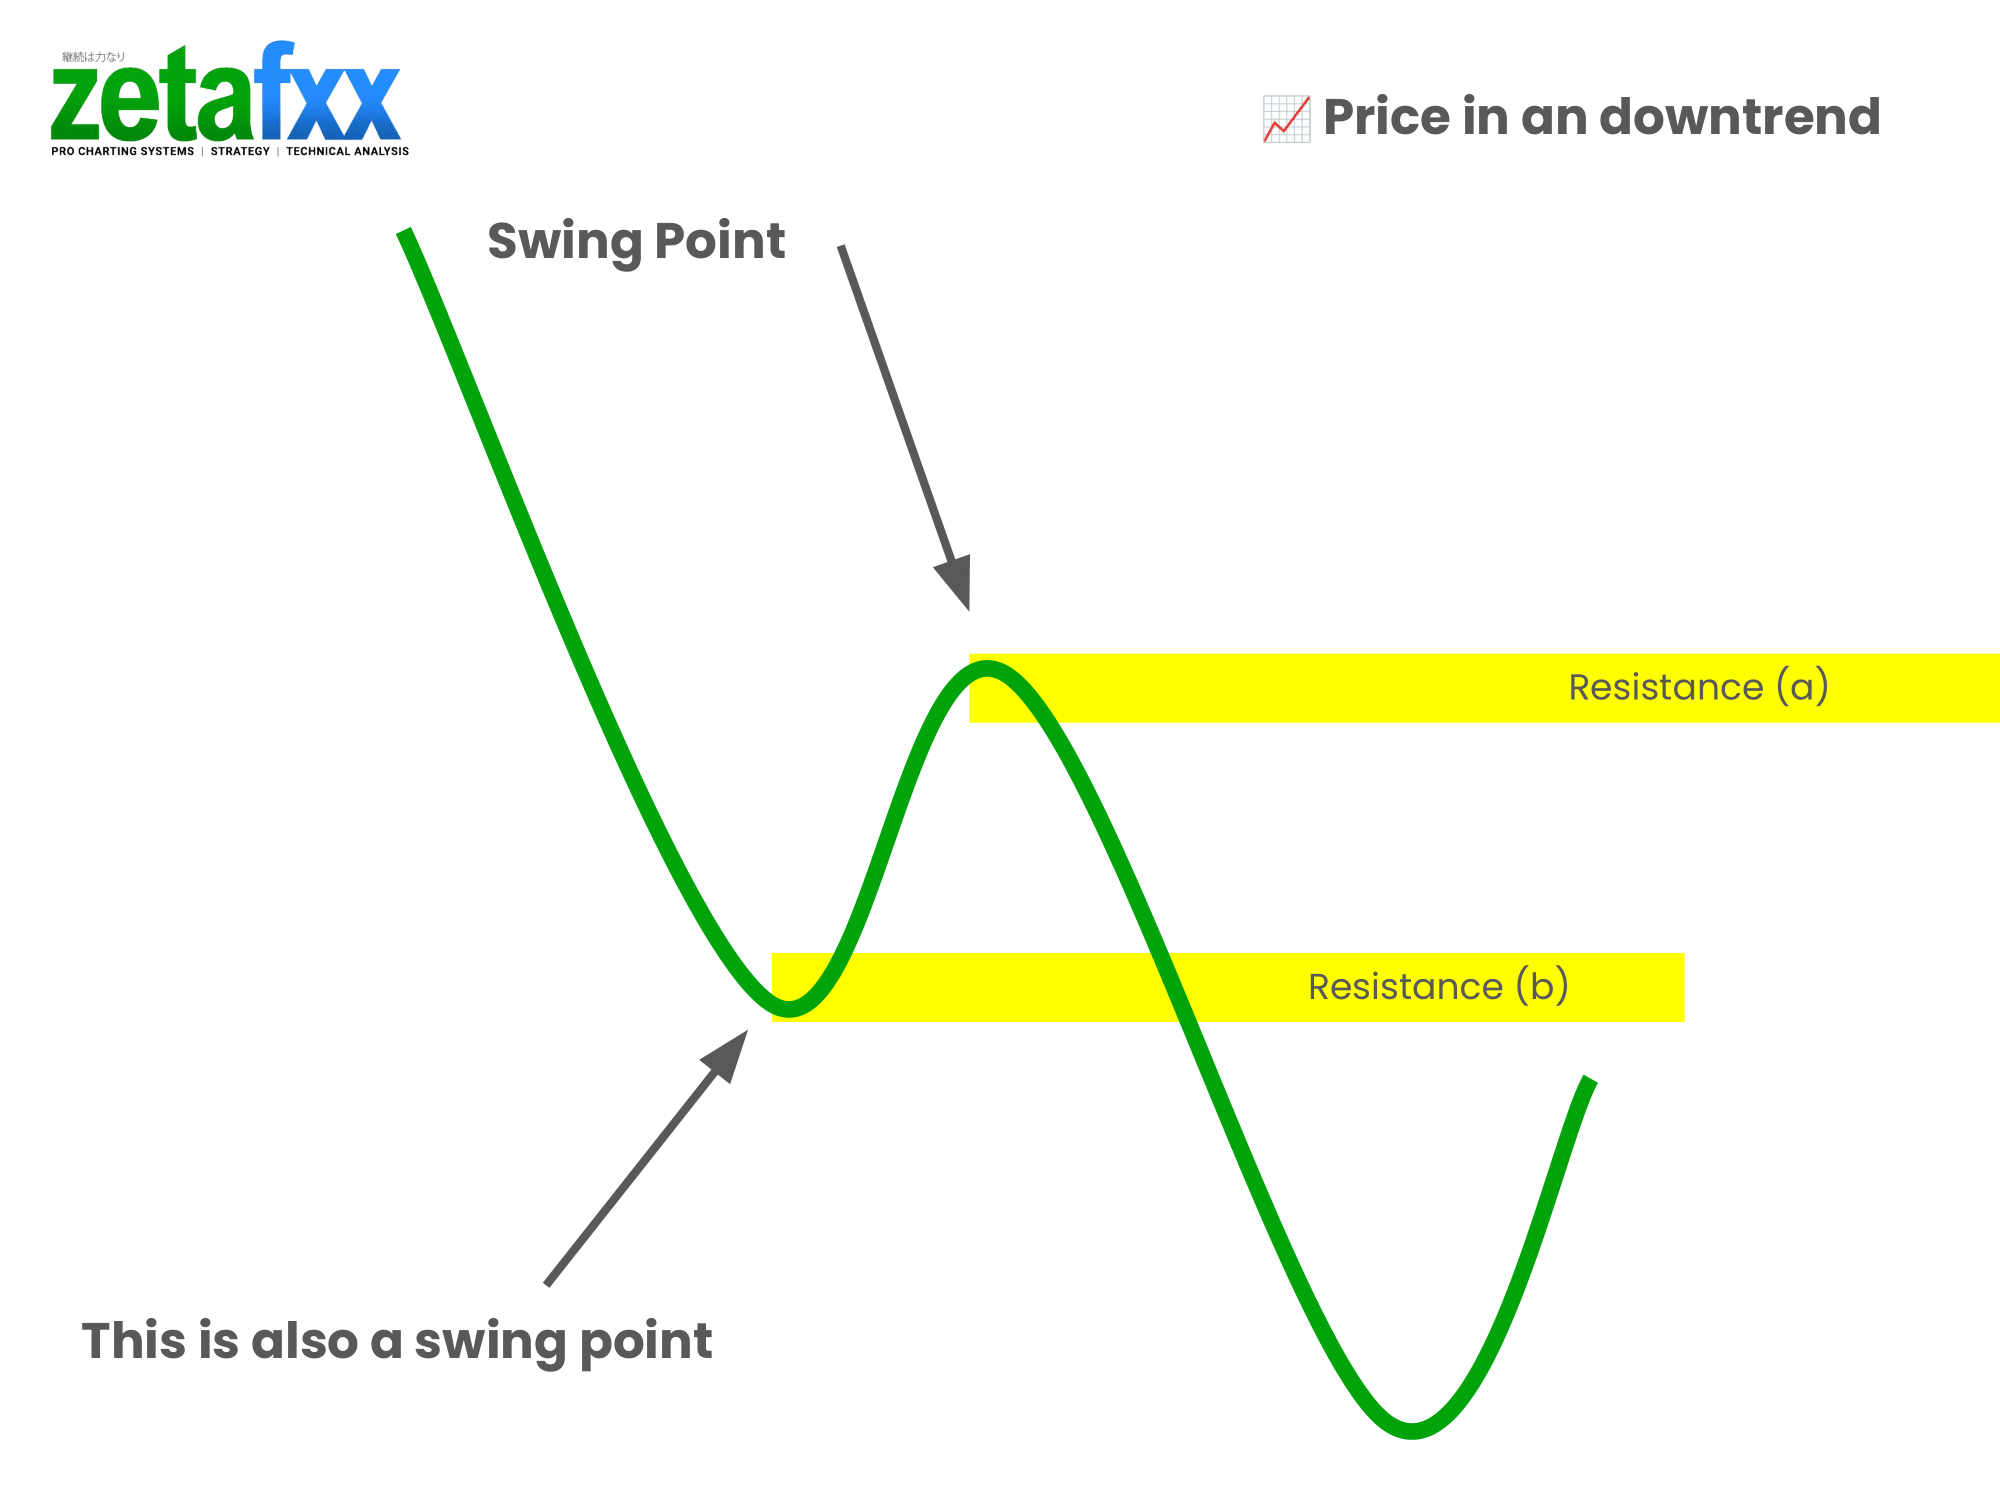
Often, you will see a price reject resistance zone (B) in a strong downtrend.

However, you will often see examples of price rejection at (A).
It doesn’t mean that the trend has changed once price has broken past point (B)! Point (B) often is the safer option to take a trade from in a downtrend.

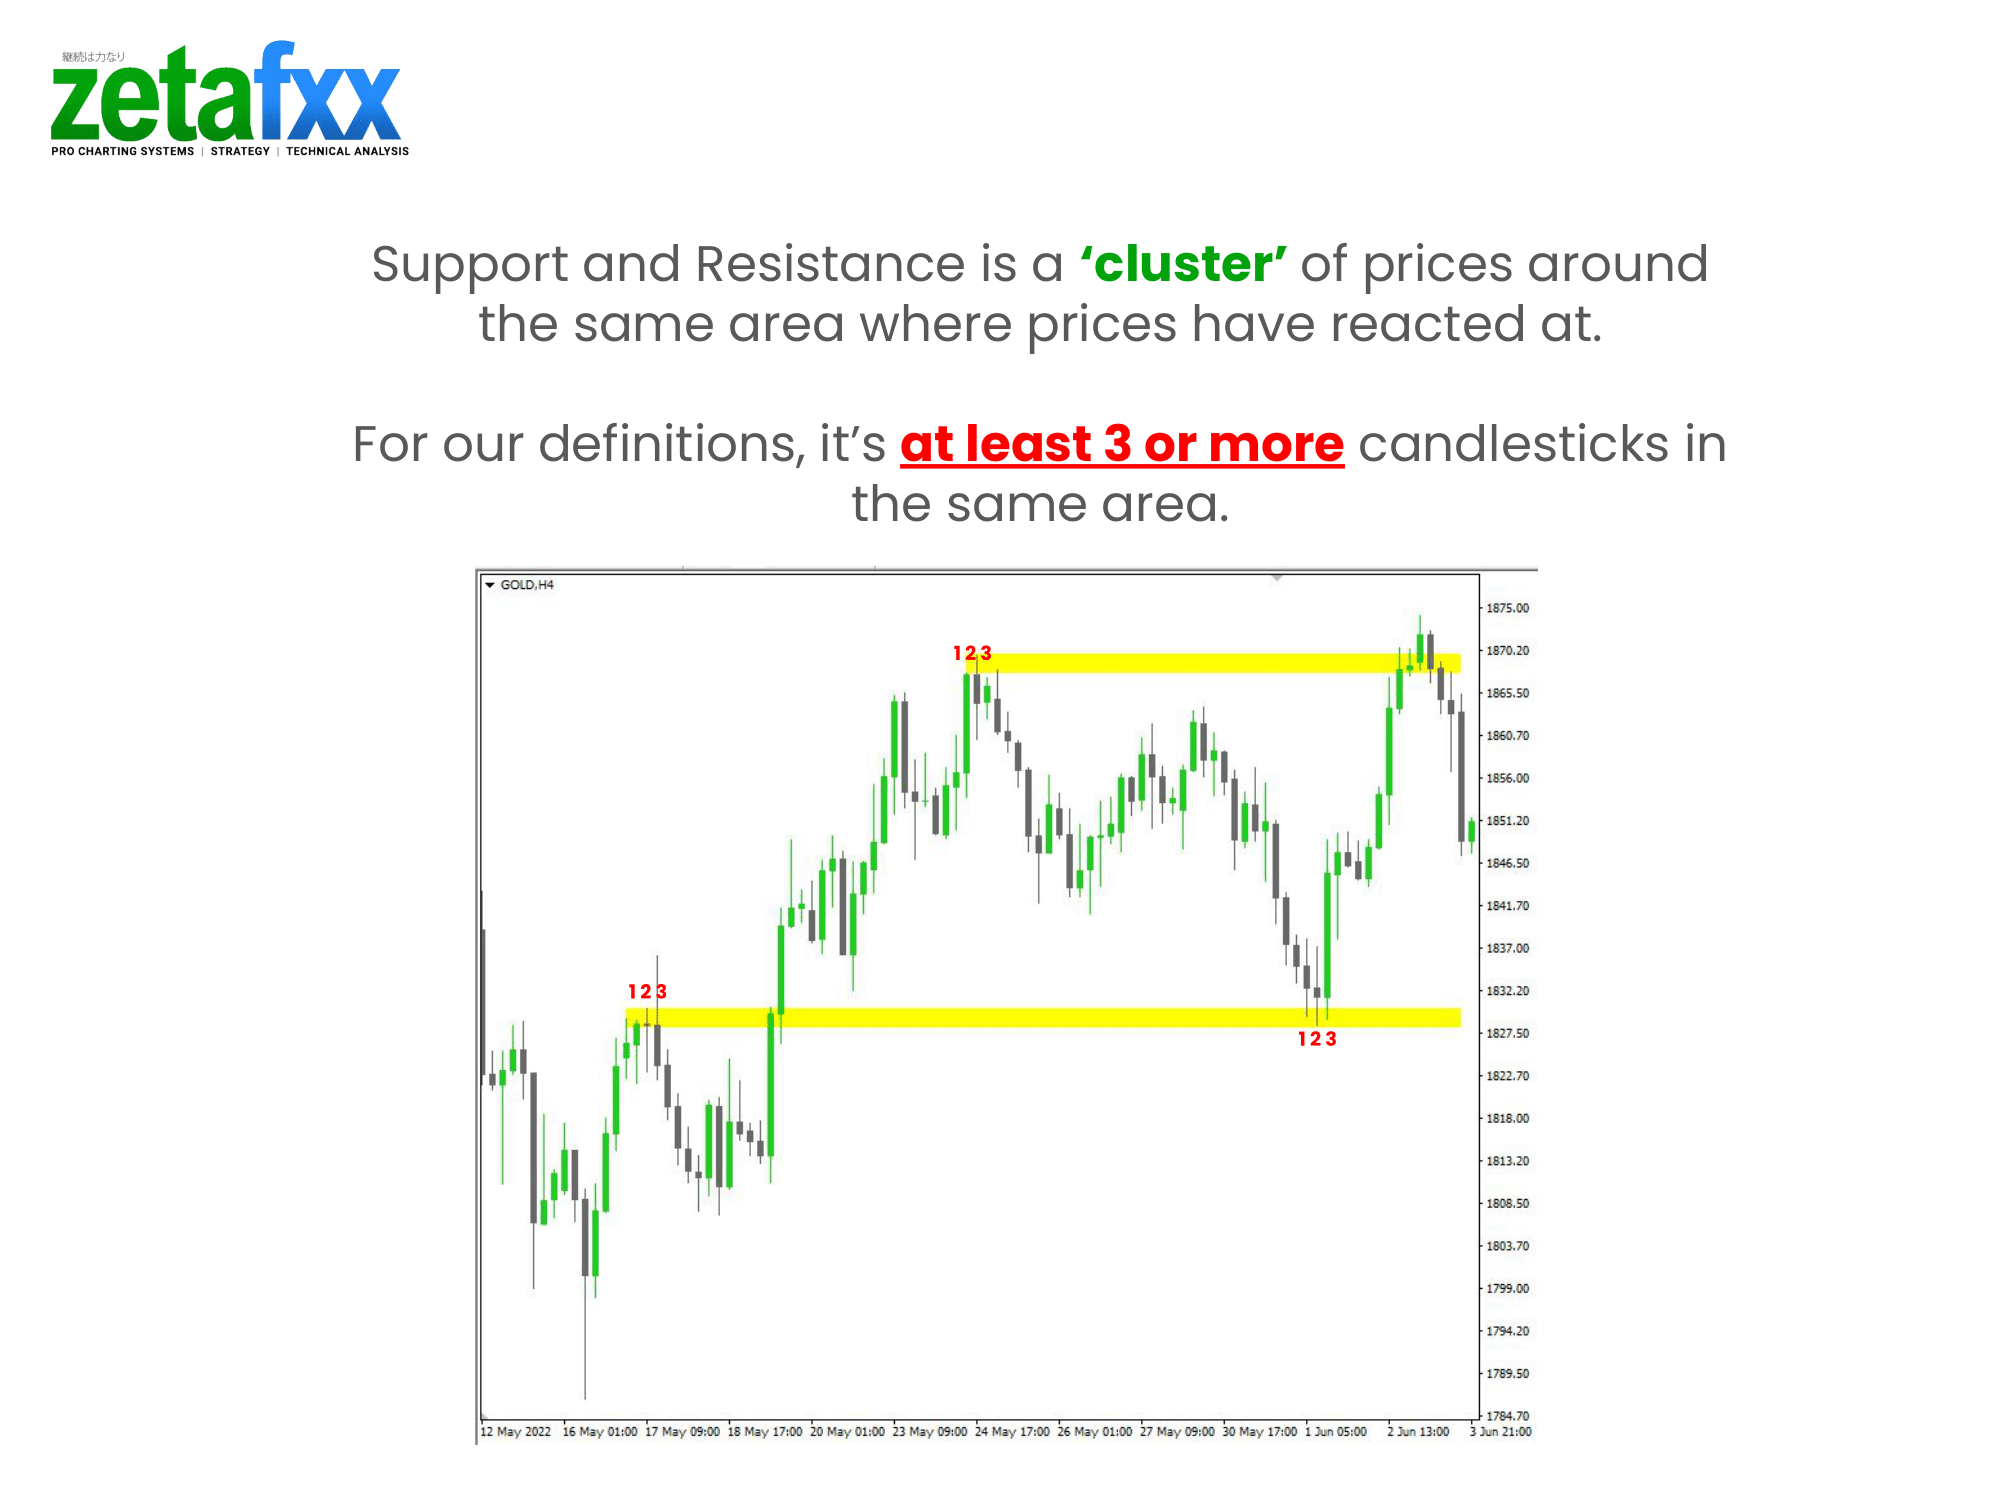
How to Identify Support and Resistance Zones
To identify a support or resistance zone, you will first need to find swing points where there are a cluster of candlesticks.
We usually work with three or more candlesticks in the same area or zone.
In this illustration below, you will see several swing points where there are 3 or more candlesticks around the same price point.
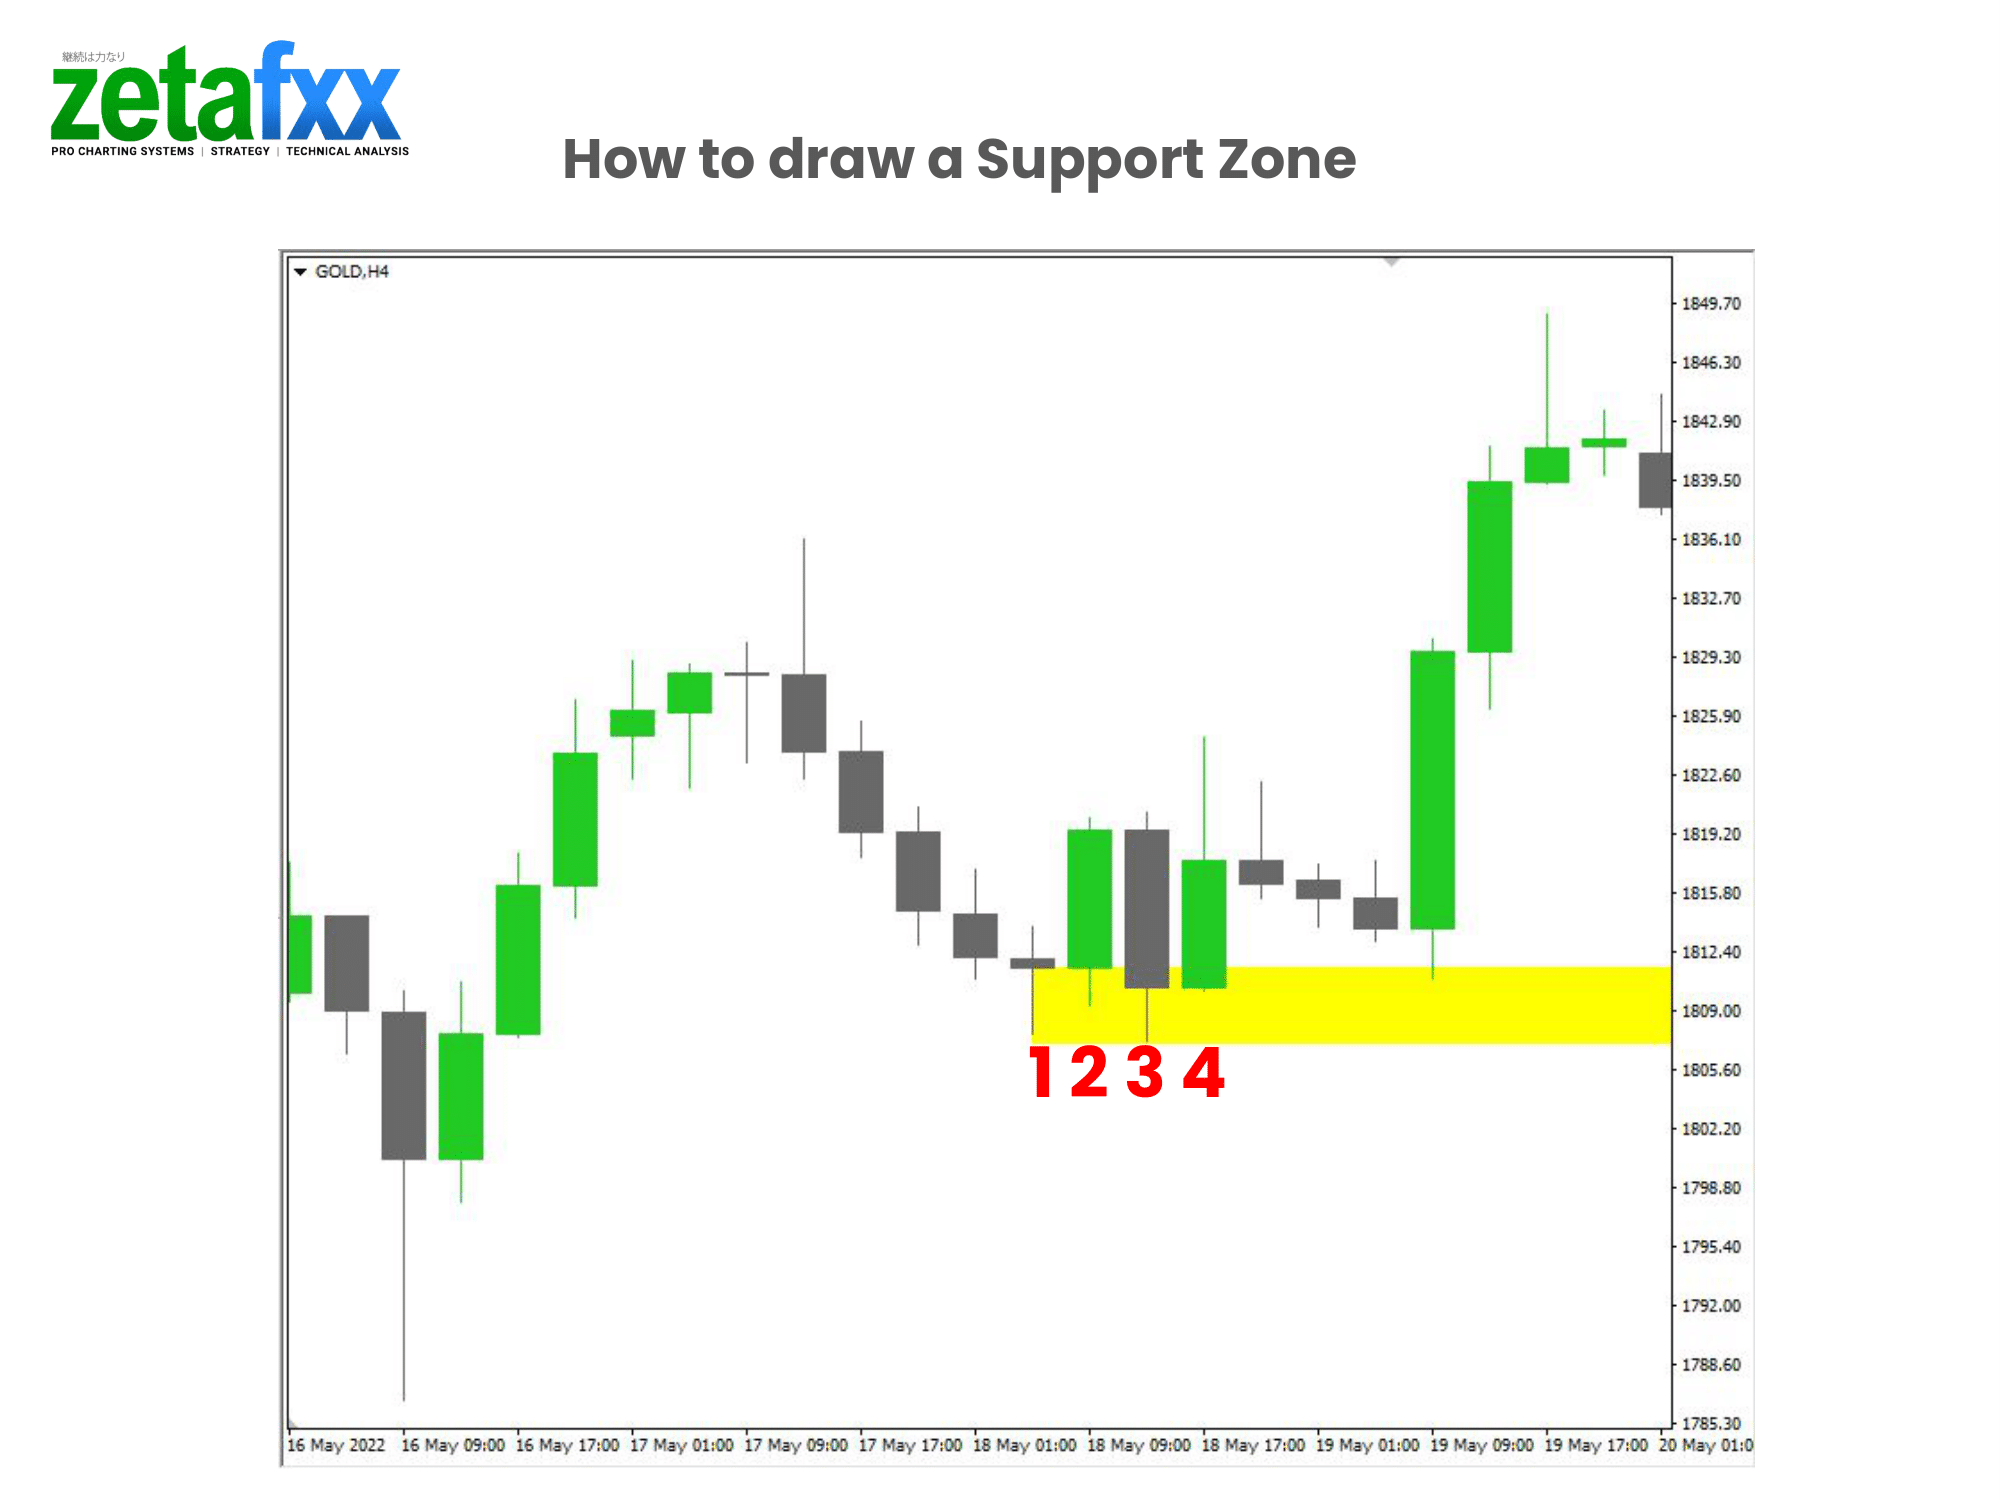
In the example below, we have identified and drawn a support zone (in yellow) at an area where the price has been (four candlesticks clustering around the same price level).
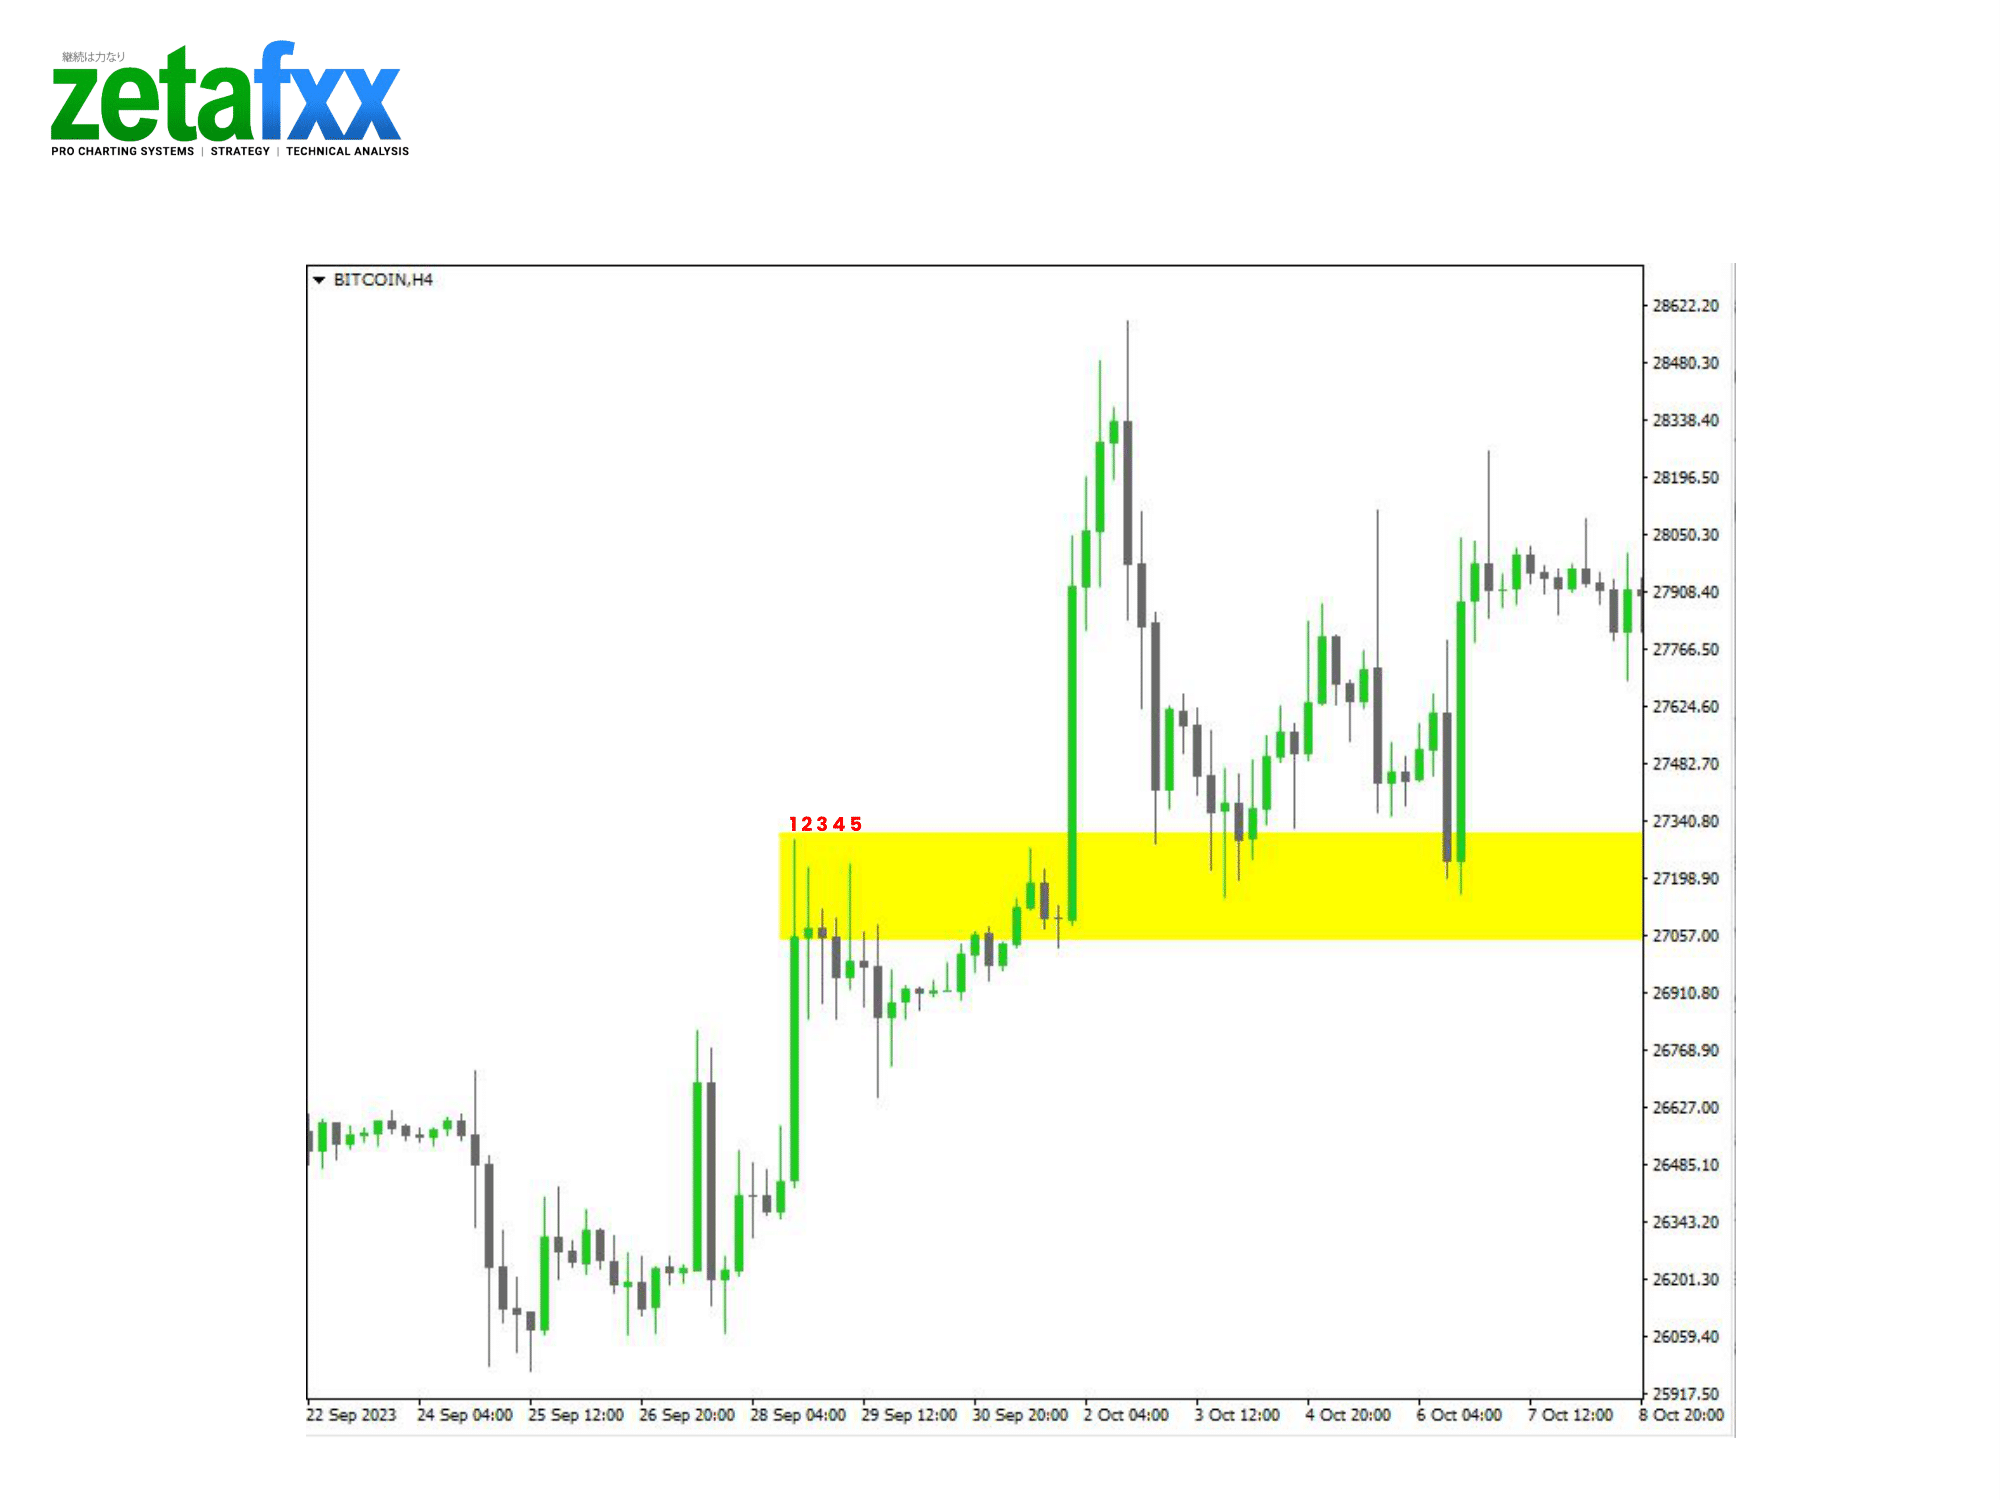
In this example, you will see how we have identified and drawn a support zone that has extended far into the future and identified where price has ‘bounced’. We have used a three-candlestick cluster at a swing point to draw our support zone.

When Price Breaks past Resistance Zones
In this example for Gold, we see price ‘breaking’ past the resistance zone.
A resistance zone, once broken through, becomes support!

You can also see this example in Bitcoin.
Basic Candlestick Formations
Before we get further in the tutorial, it’s key for you to understand how candlesticks are formed. You can learn about the basics of candlesticks on this page.

How to draw Support and Resistance Zones
Identifying and drawing your zones will help you identify key turn-around points in your trading. We’ll show you examples of how to do this properly.

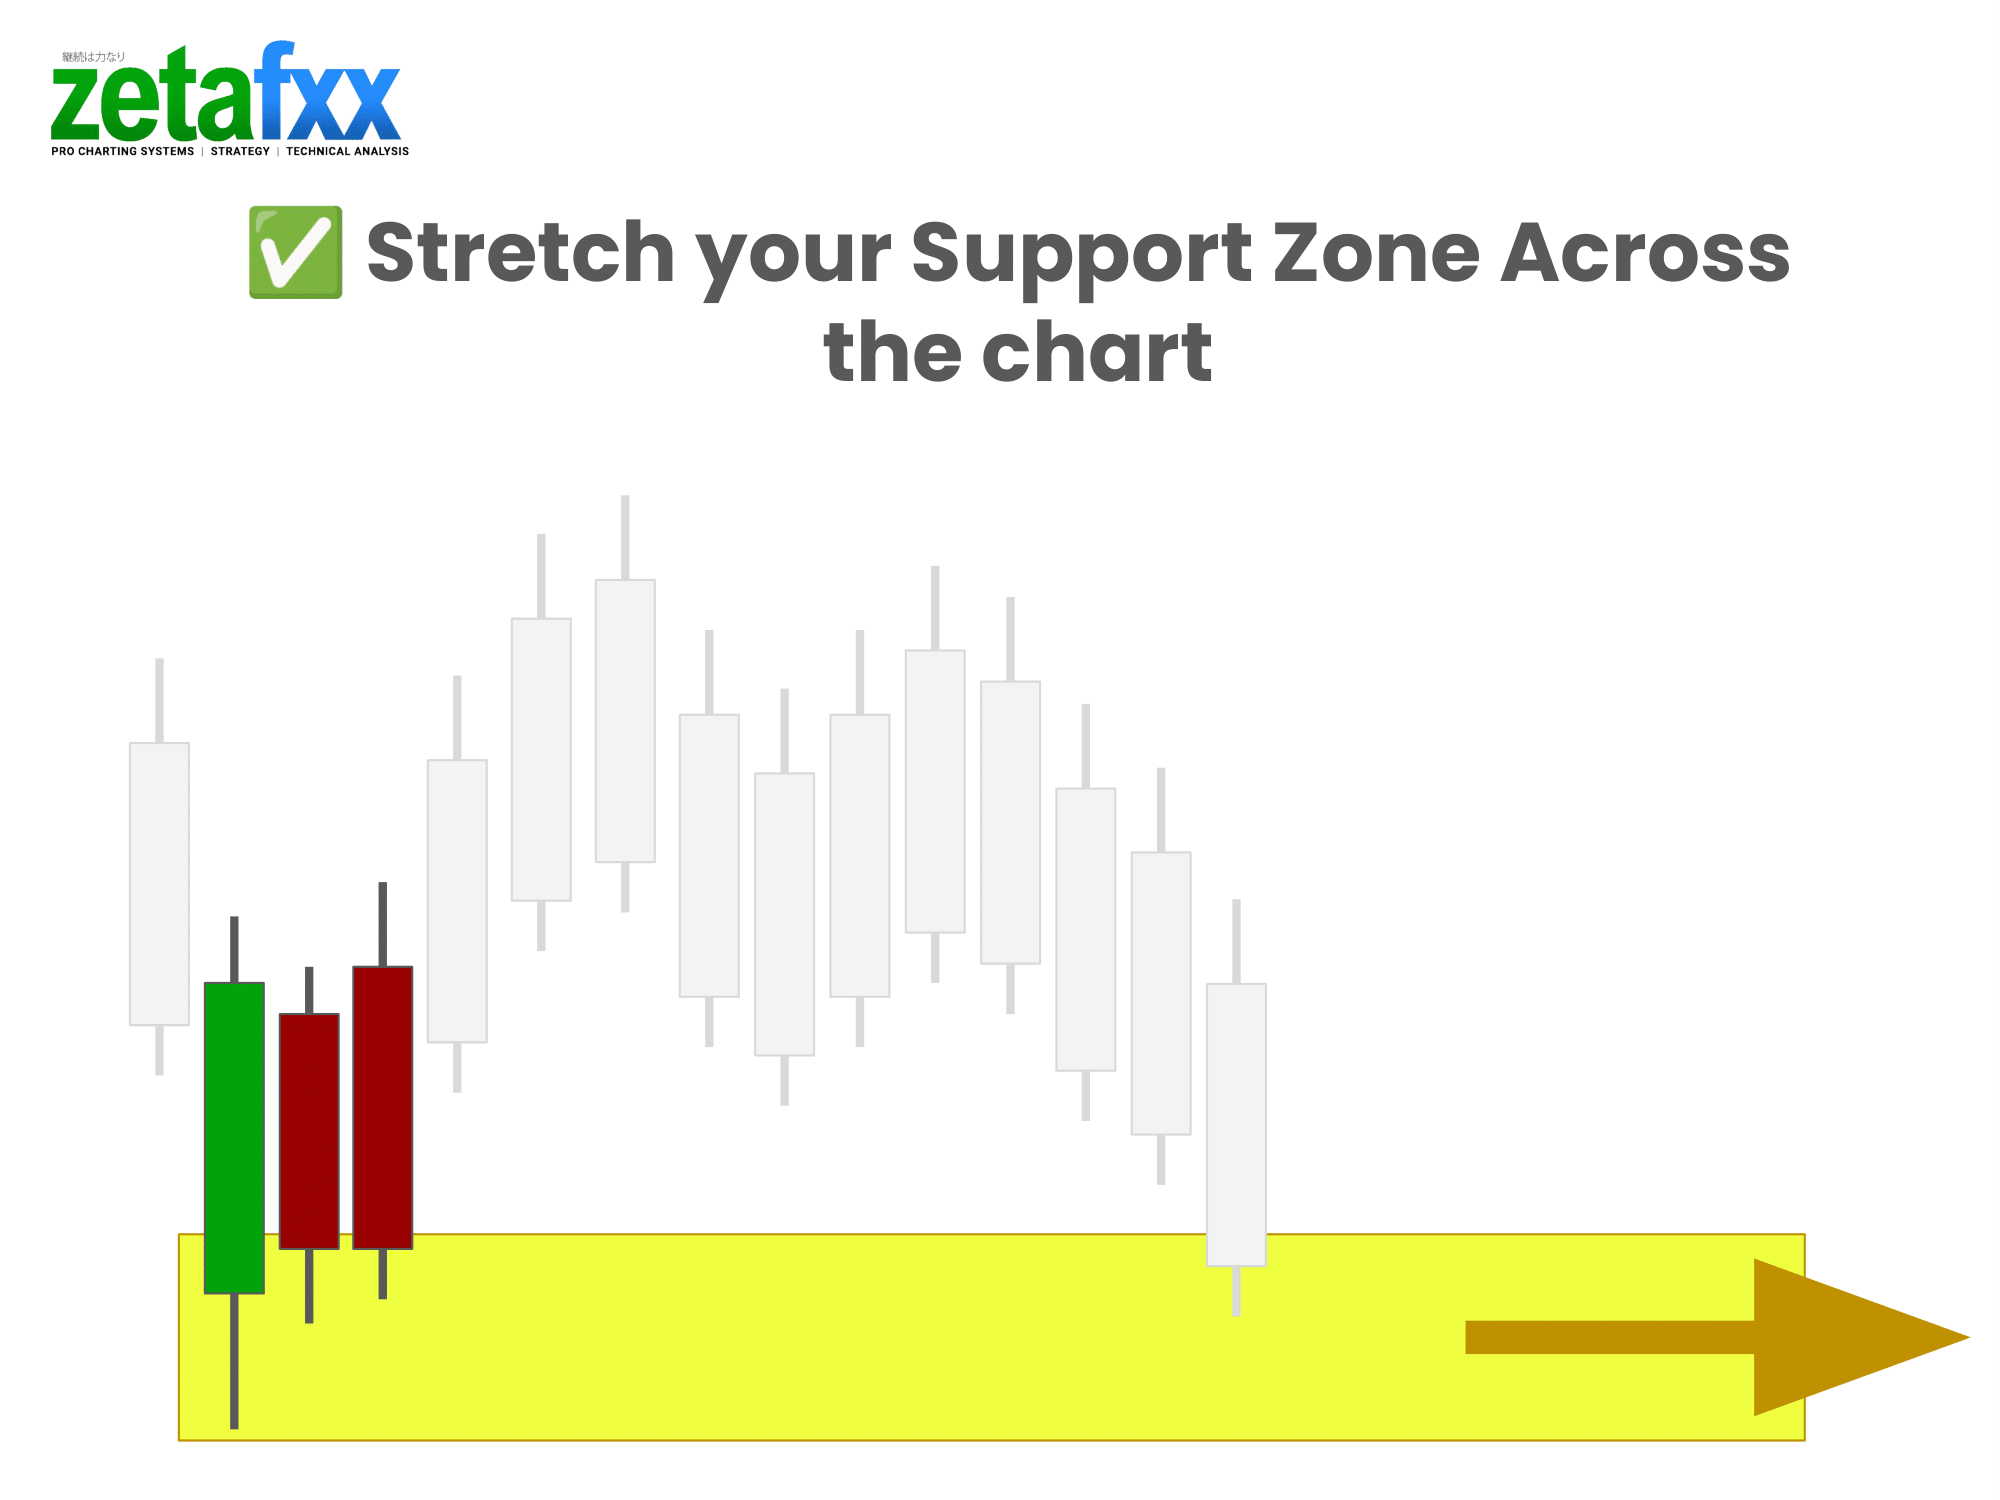
✅How to draw your support zones correctly
Identify at least three candlesticks in the same area to draw your support zone.
- Using a drawing tool in your trading platform, use a rectangular shape and start drawing from the lower candlestick wick up to the body.

Stretch this zone across the chart so you can have a clear, visual reference when price touches the same level again.
❌The wrong way to draw your support zones.
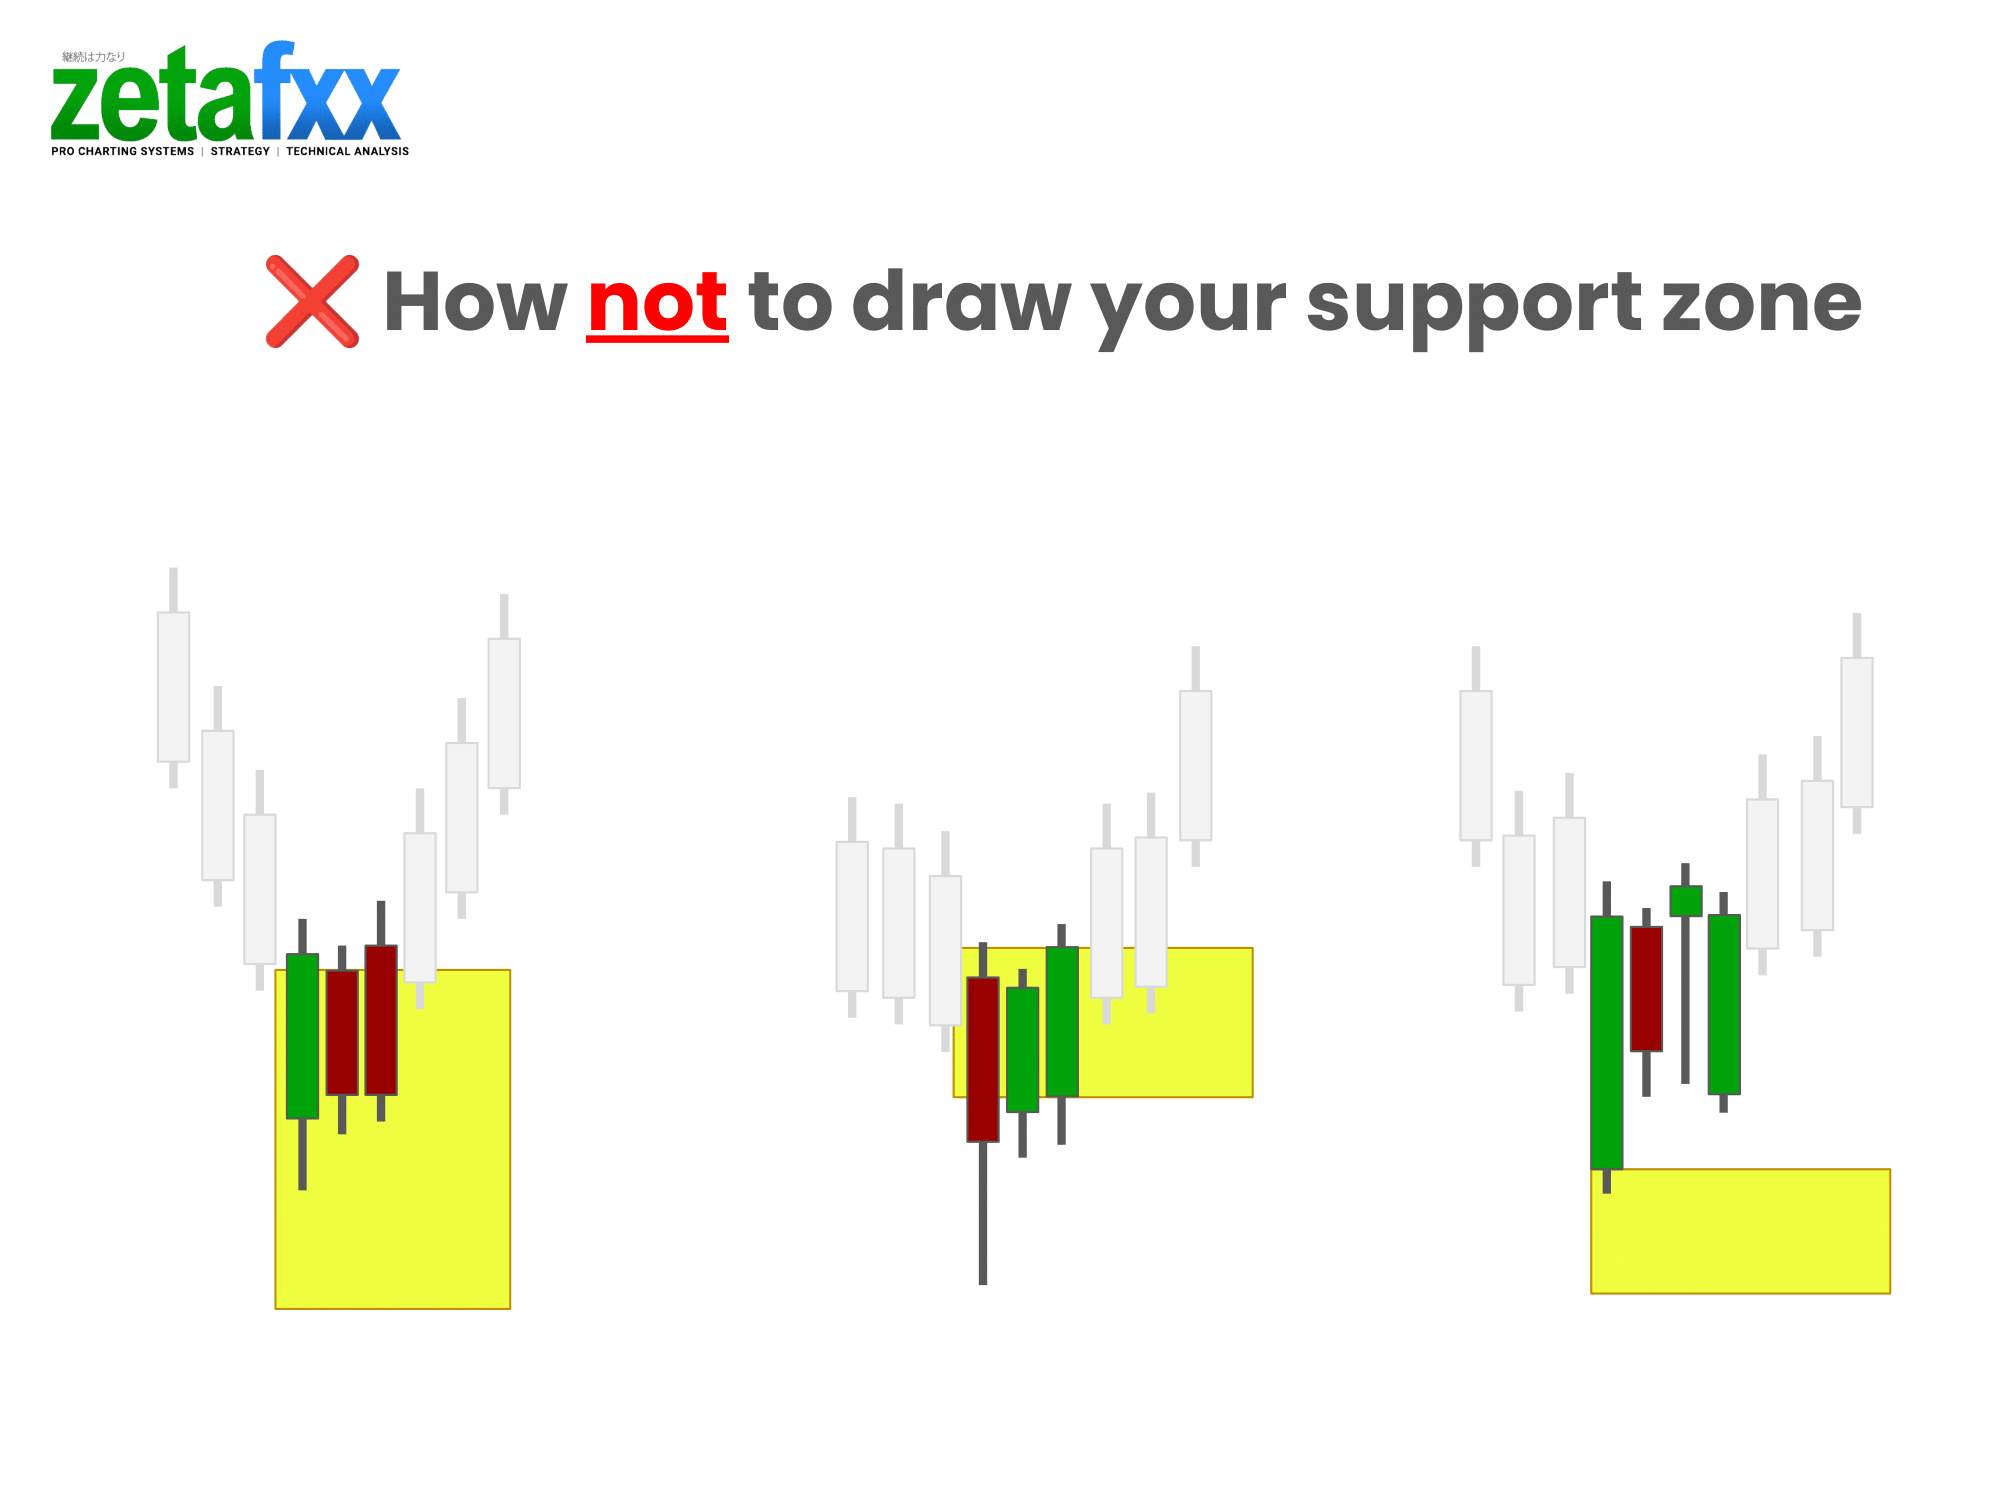
The first example on the left shows that the zone extends too far past the lower shadow.
The centre example shows that the zone does not cover the 1st candle’s lower shadow and body.
The last example on the right shows the zone not covering the main body and cluster of candlesticks. This will lead to inaccuracy for future reference.
✅How to draw your resistance zones correctly
Like the support zone, use a rectangular shape and draw from the upper shadow to the body of the candlestick.

Then, stretch this zone across the chart for future reference.

❌The wrong way to draw your resistance zones
These are some examples on how not to draw your resistance zones.
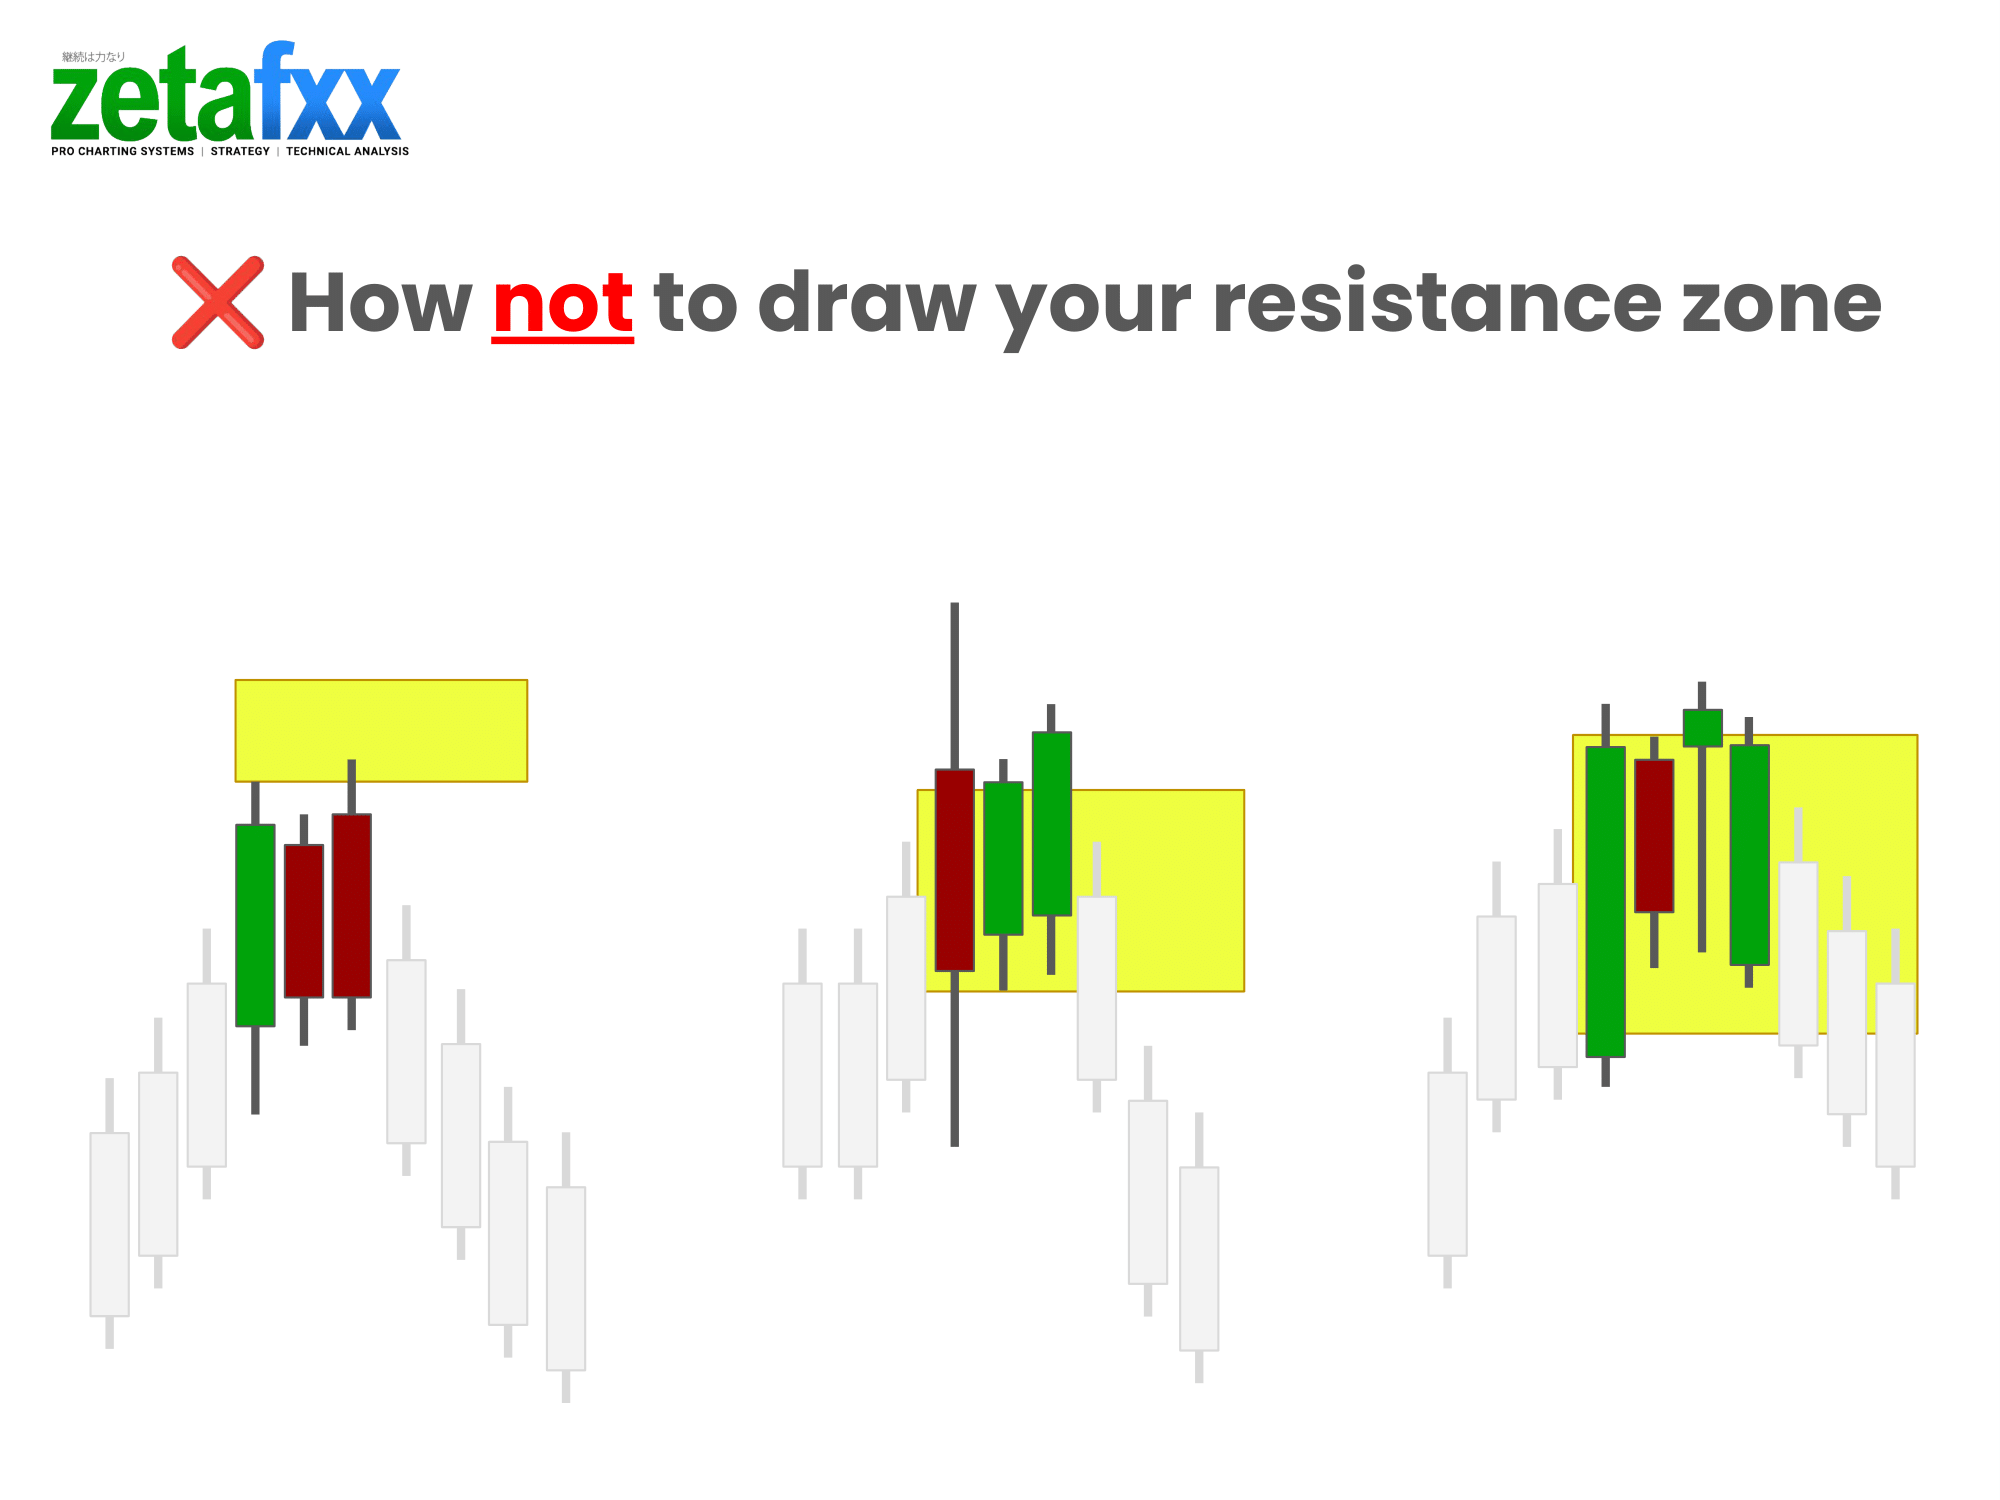
The first example on the left shows the resistance zone too far from the bodies of the cluster of candlesticks.
The centre example shows the zone not covering the upper shadow of the 1st candle in the cluster of candlesticks.
The last example on the right shows the zone being drawn too far into the bodies of the cluster, giving a less accurate area for your support area to be referenced in future.
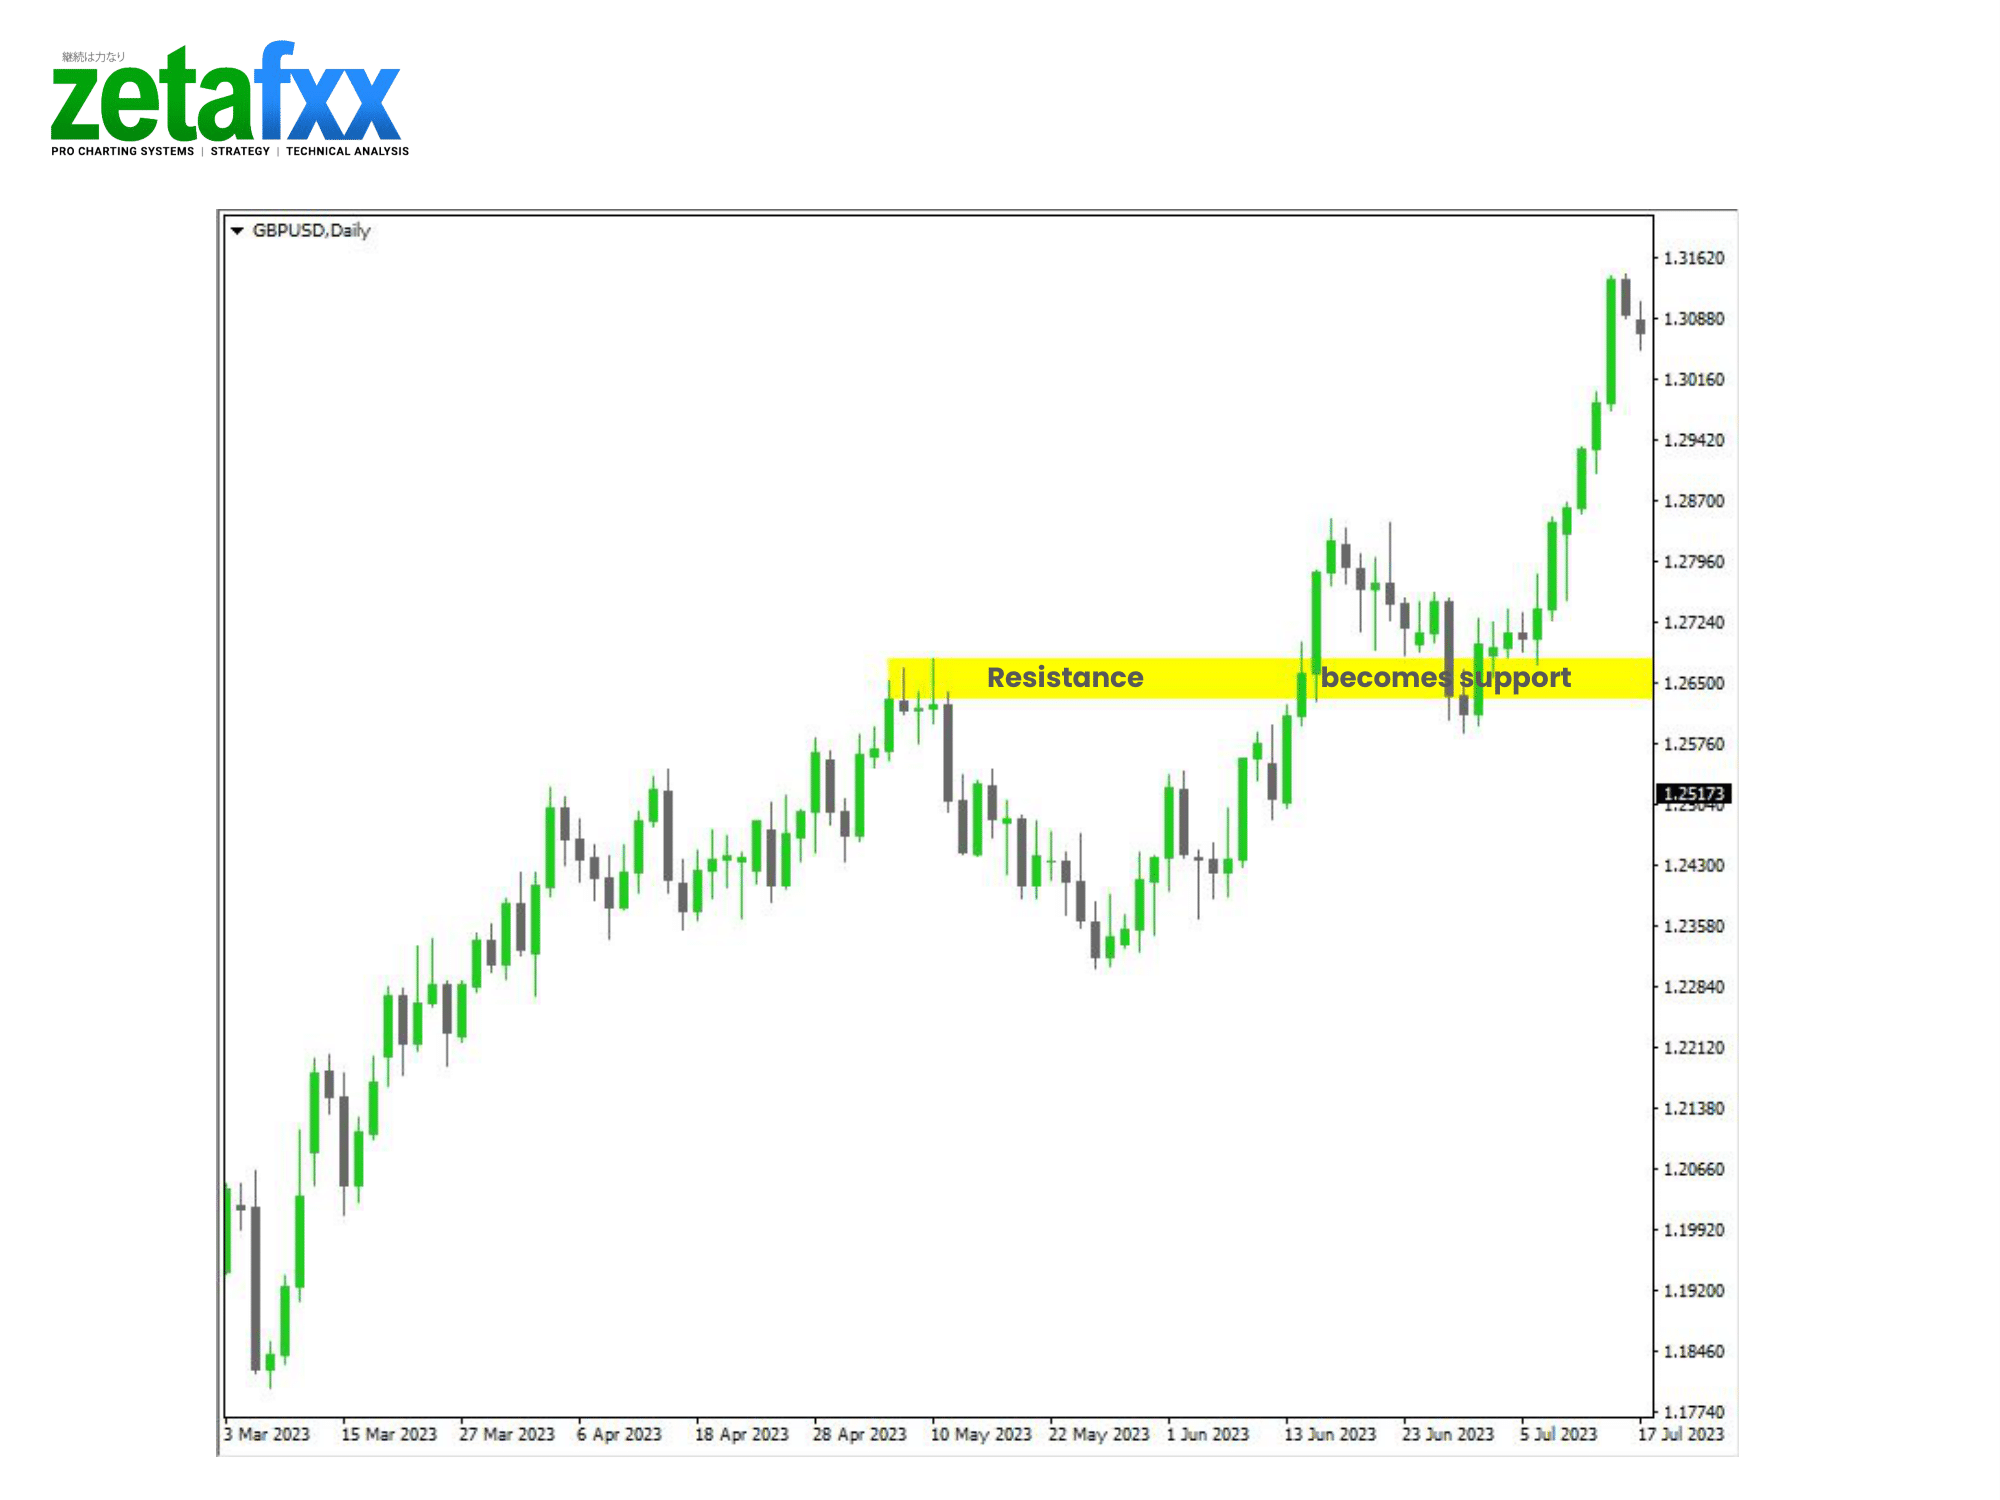
🔄 Resistance becoming Support
Both resistance and support levels can be broken by volatile moves in the market.
You can see these examples of how prices respect support and resistance levels.
Example 1: Bitcoin – Price breaking through a resistance zone that becomes a support zone.

Example 2: GBPUSD – Price breaking through a resistance zone that becomes a support zone.
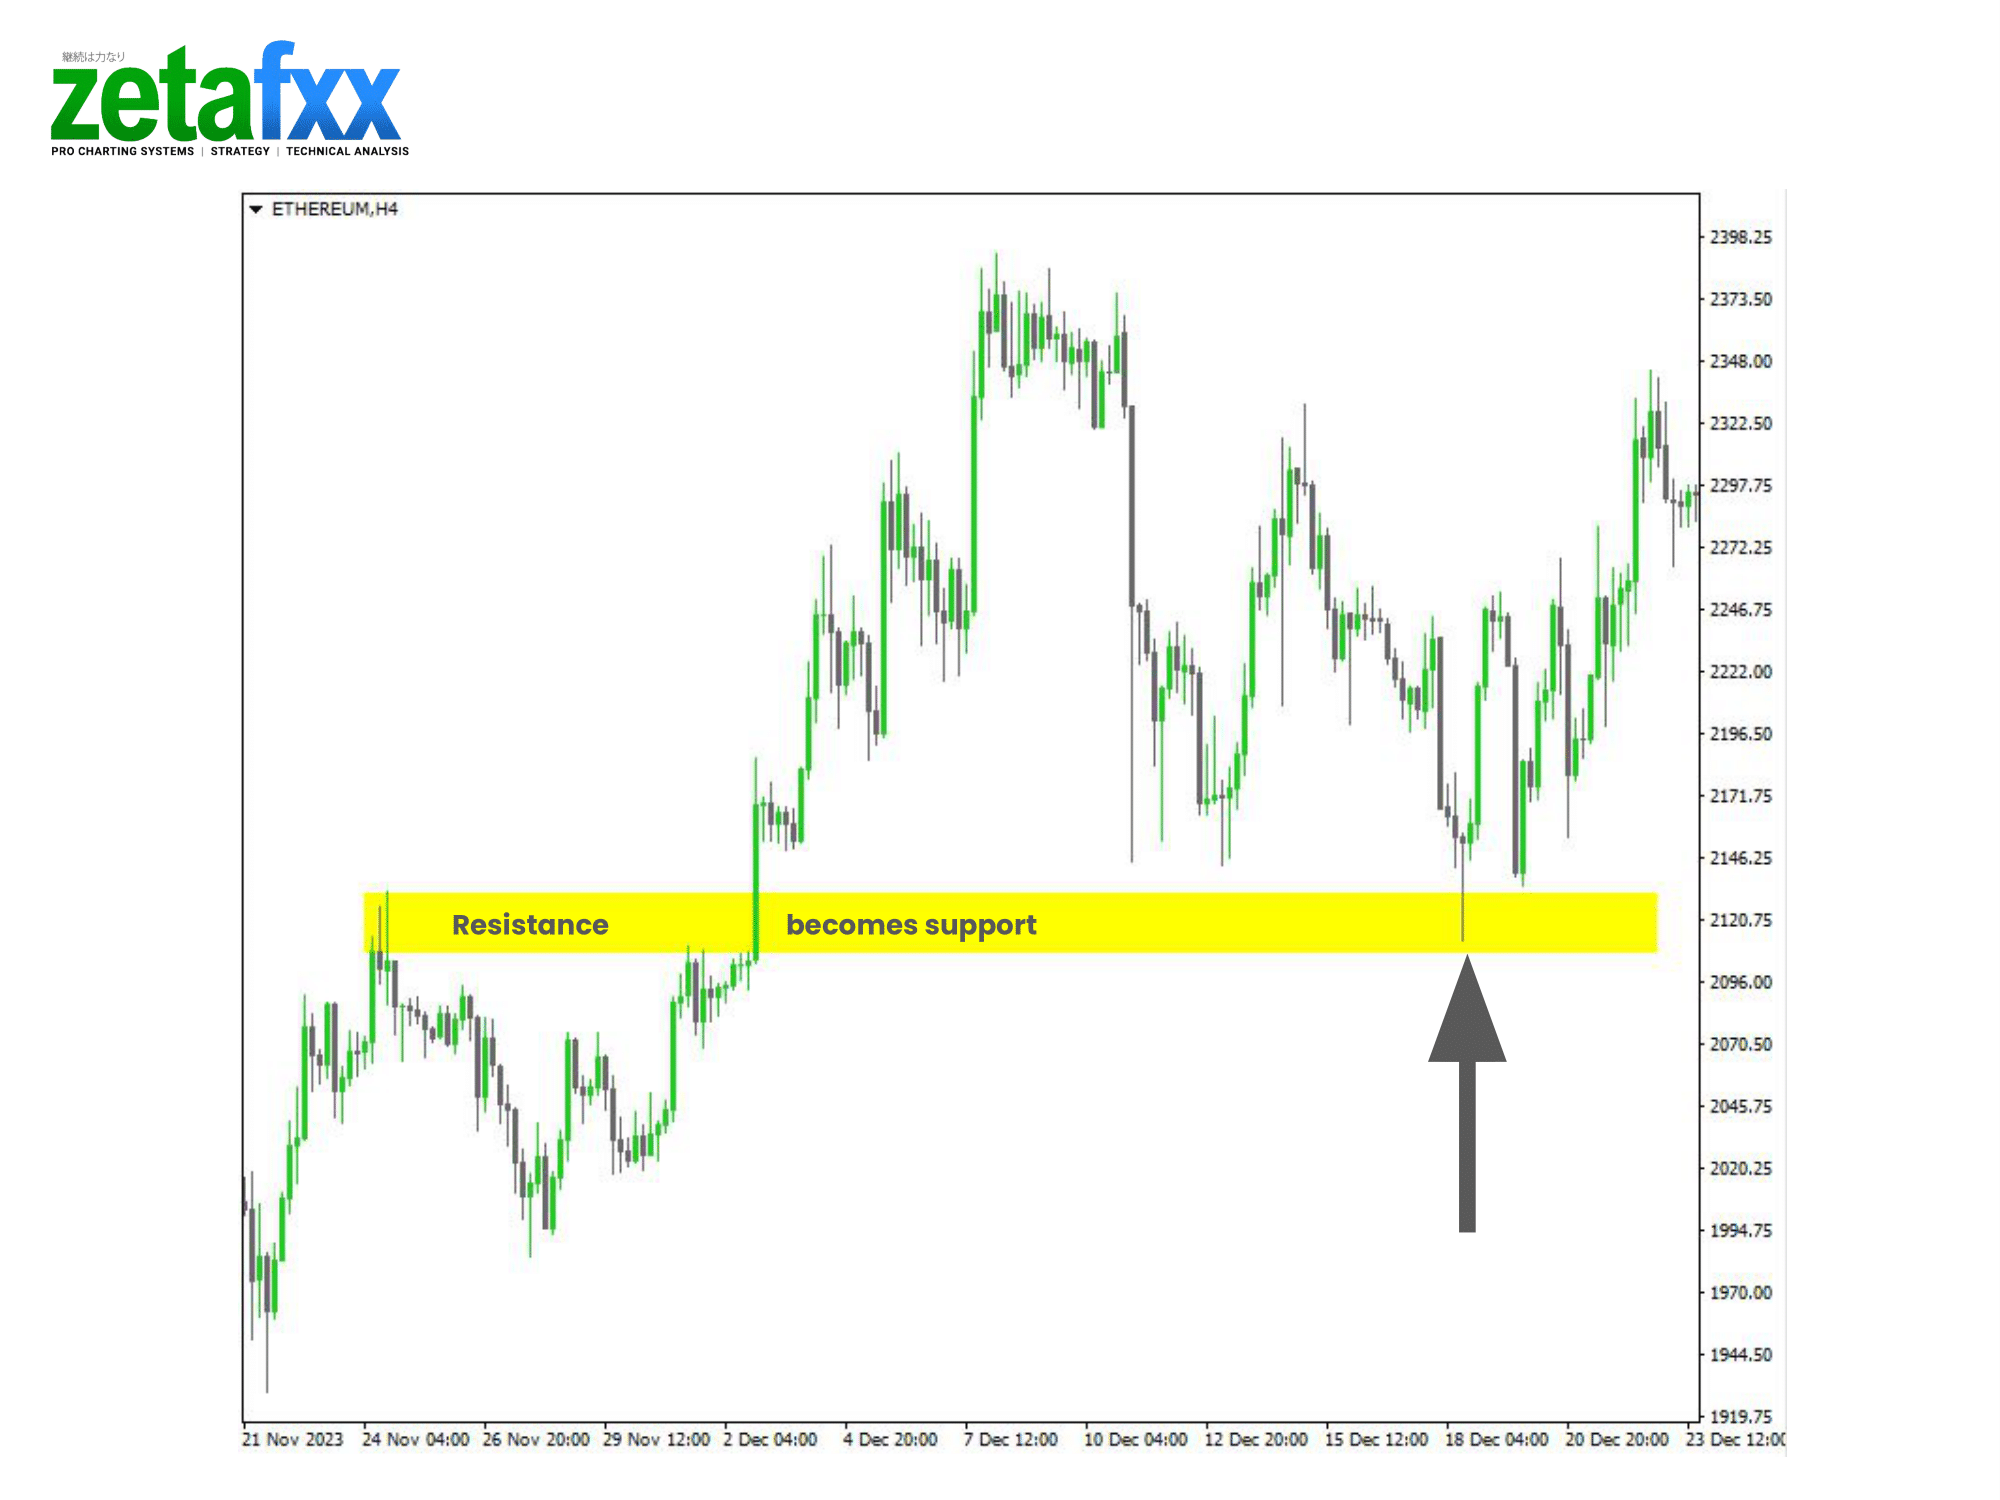
Example 3: Ethereum prices also break through resistance zones on the 4H, retesting the support zone and continuing the trend.
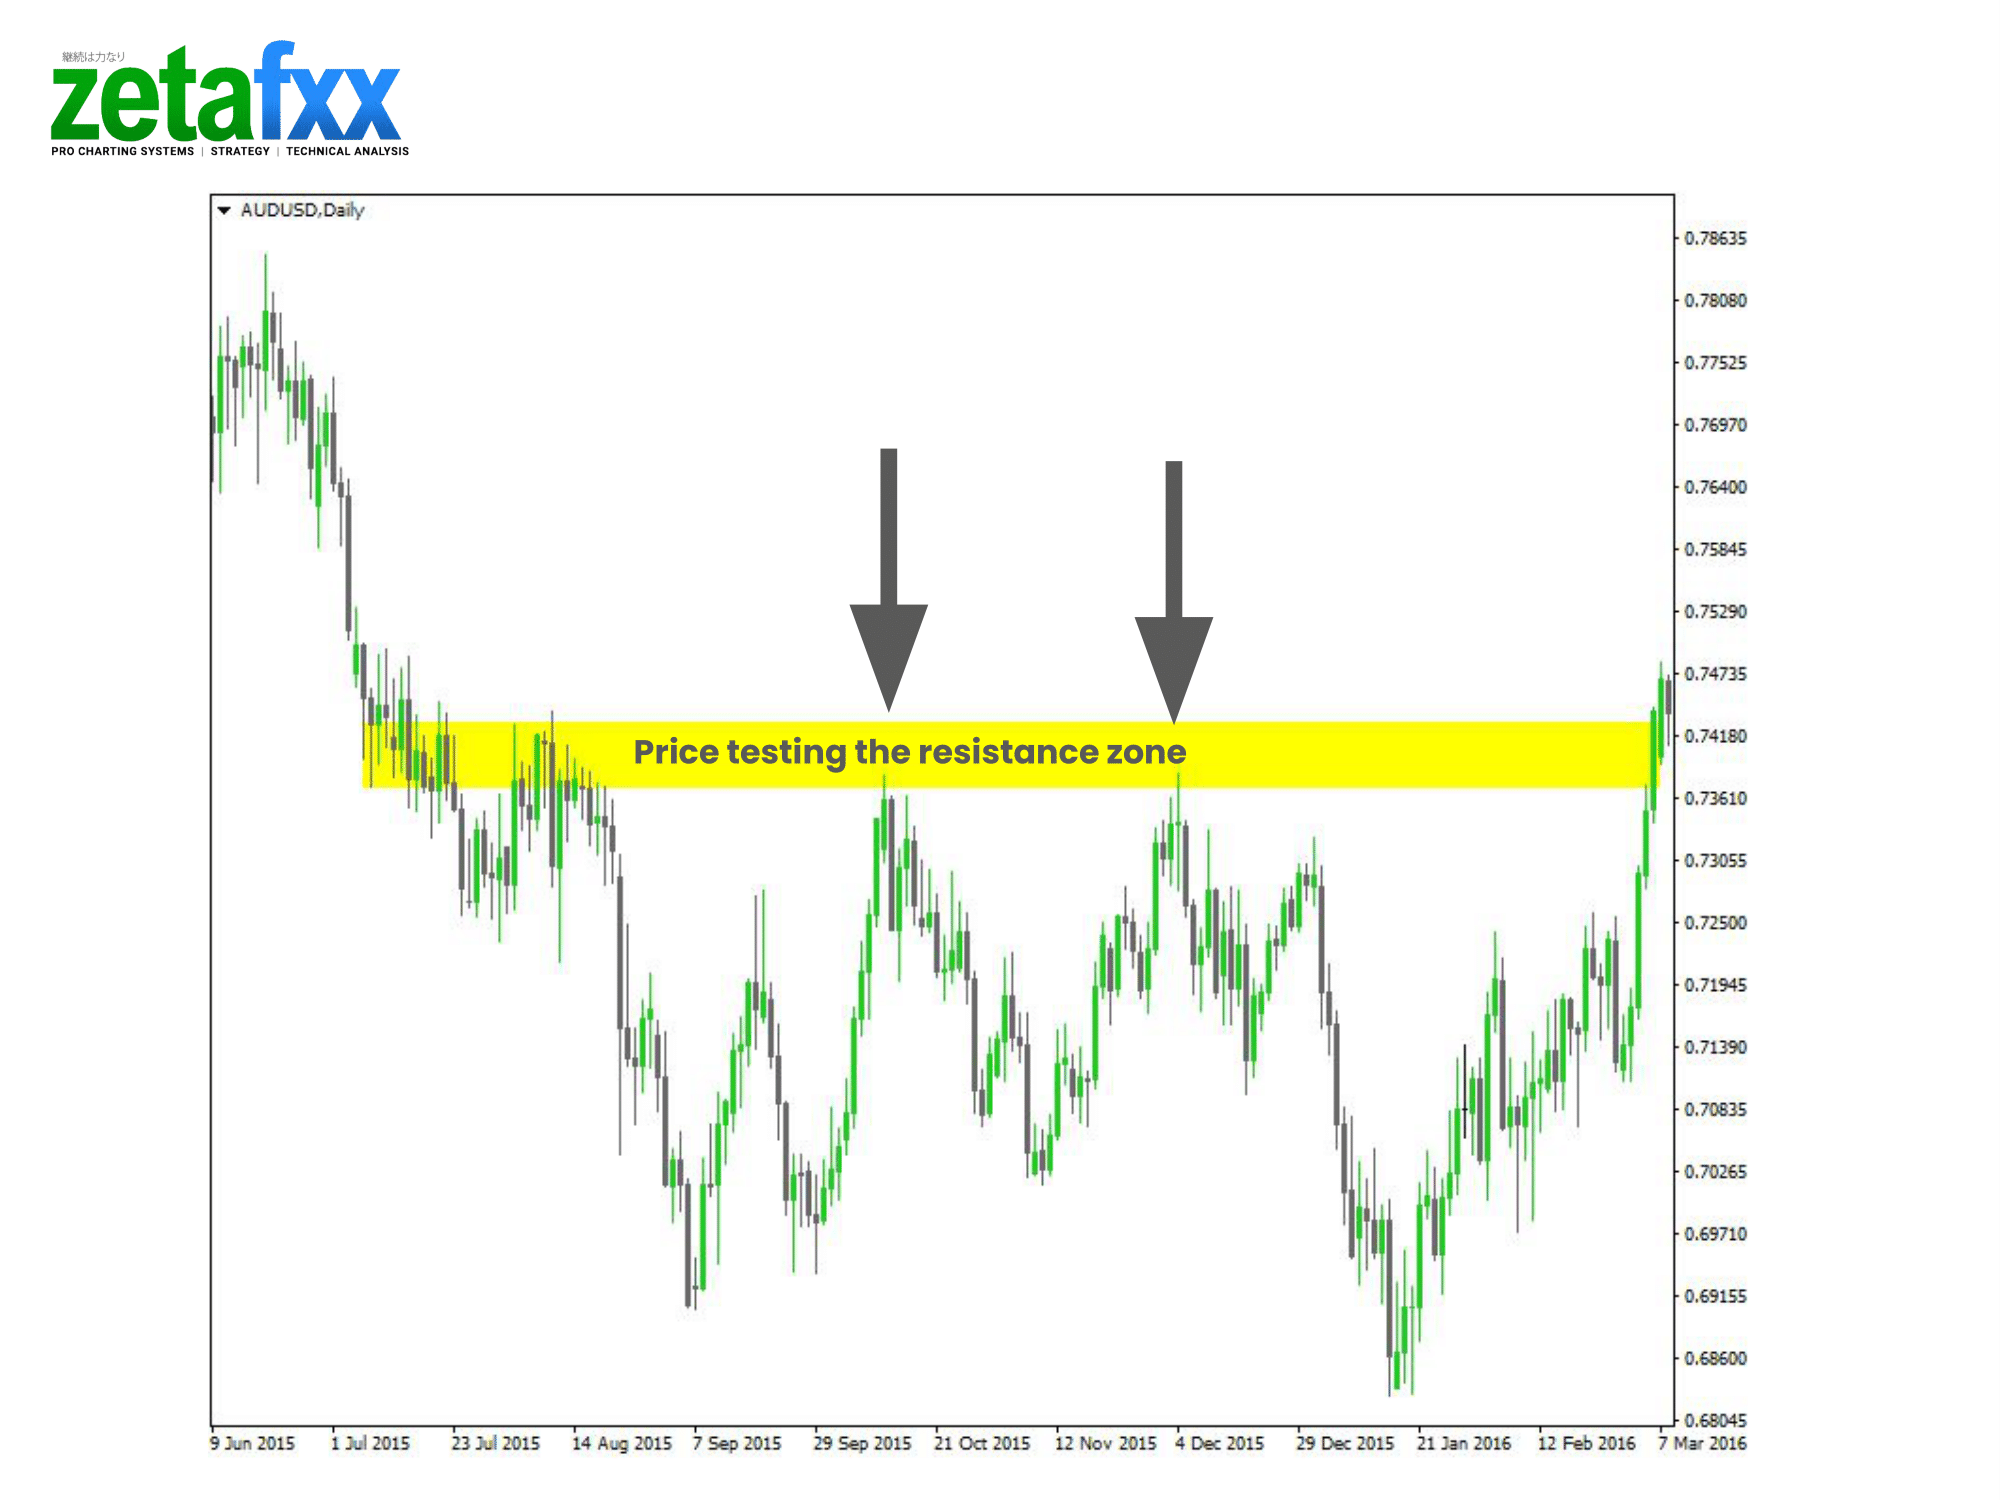
Example 4: In this example, you can see how prices test the support zone multiple times in an uptrend.

🔄Support turning into resistance
In this example, you will see how prices can go from a support zone to a resistance zone once they break through in a downtrend.
In this example, the S&P500 chart shows the price retesting the previous support zone(now the resistance zone) and then continuing downwards in the trend.
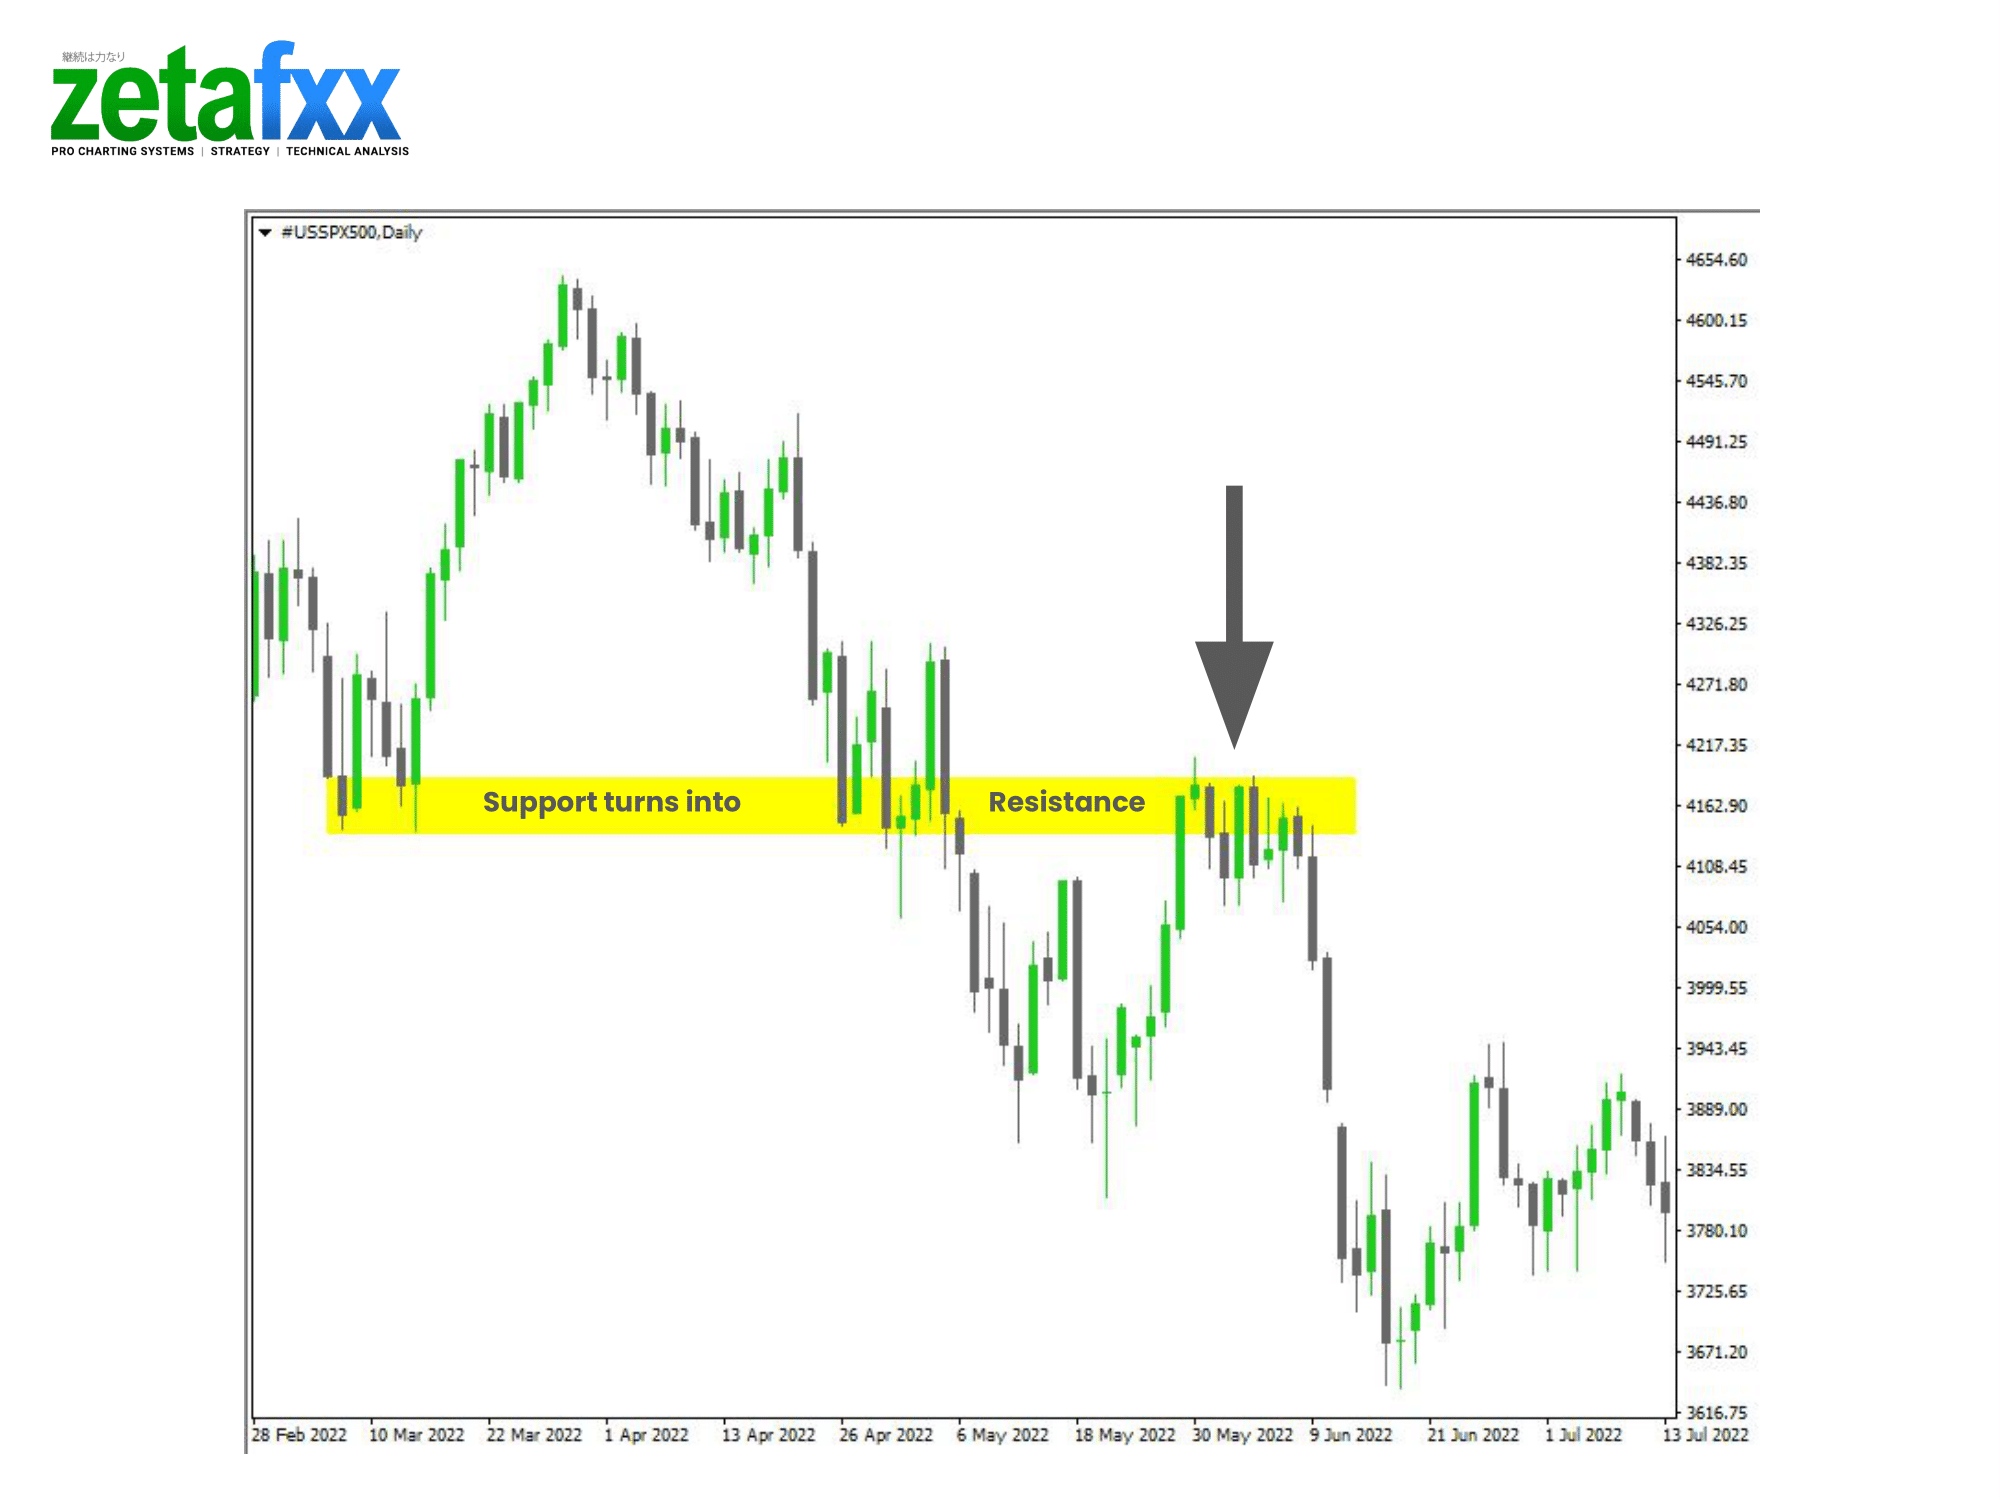
In this example, prices often revisit (also known as retest) the resistance zones.
Trading Strategy with the Support and Resistance Zones
Support Zone Confirmation – Buy when you see a candlestick open and closed above the support zone

Resistance Zone Confirmation – Buy when you see a candlestick open and close below the Resistance zone

Trading the support and resistance zones requires a couple of steps for maximum success. This checklist below highlights the key steps for your trading success. Use this on large timeframes, such as daily or weekly charts, for the highest odds of success.
Support and Resistance Trading Checklist📝
Step 1. Identify the primary trend (Bullish/Bearish)
Step 2. Identify Swing Points
Step 3. Draw your Support or Resistance Zones
Step 4. Wait for a confirmation candlestick.
- For a ↗️ BUY Trade – wait for a candle to OPEN AND CLOSE ABOVE the Support Zone.
- For a ↘️ SELL TRADE, wait for a candle to OPEN AND CLOSE BELOW the Resistance ZONE.
Step 5. Wait for a retest of the price to the resistance or support zone.
Step 6. Prepare a trading plan (SL, EP and TP)
⚠️Keynotes and conditions
- Review where the next major support/resistance is
- It must be at least a 1:2 risk-to-reward ratio and more
Step 7. Calculate your position size (less than 2% is ideal)
Step 8. Execute Your Trading Plan
- Let it run to your take profit zone
- Trail it and manage your trade
- Manually close
Step 7. Journal and review your trade’s outcome.
Bullish Examples Using Support Zones as a trading strategy
Check out these Bullish Examples of Trading with Support Zones.
Glossary:
❌Stop Loss – where you would close the trade in a loss
↗️ Buy Entry Price – your buy position
✅ Take Profit – where you would take your profit.
USDJPY Bullish Trend Support Buy with the Trend (Example 1)
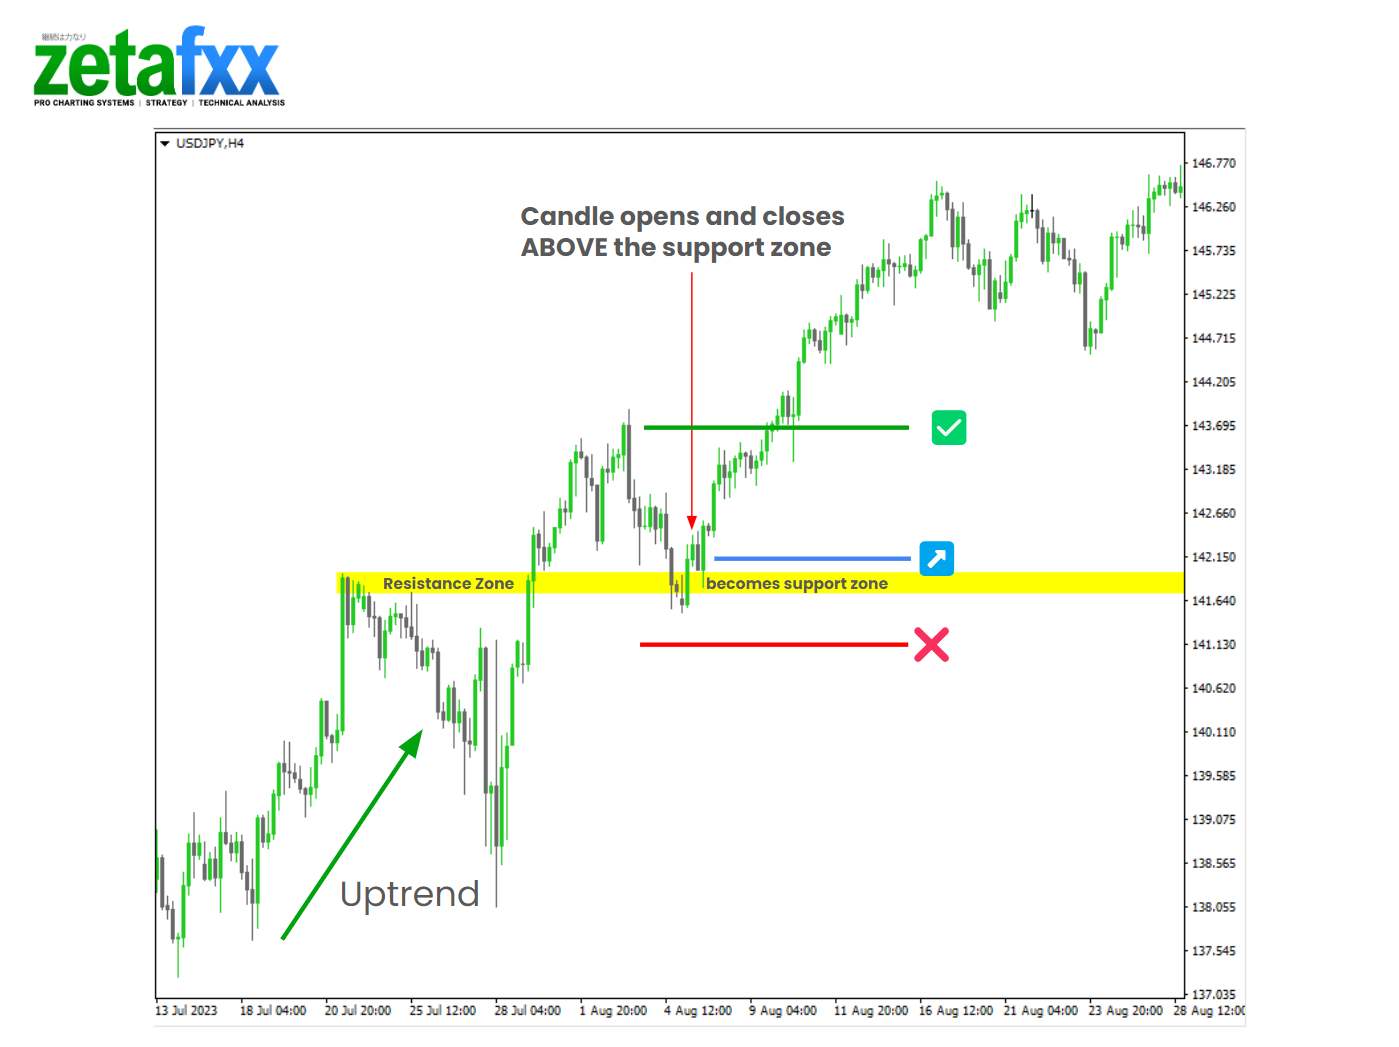
This USD/JPY Support Buy Trade has the following factors to make this a successful trade:
- The overall uptrend is in line with the larger timeframe
- Candle open and close above the support zone
- Stop loss under the support zone
- Take profit at the next major resistance level
- It has more than a 1:2 risk-to-reward ratio
- Buying at a retest is a safer entry than buying the break of the support zone.
Let’s look at the next example.
Ethereum Bullish Trend Support Buy with the Trend (Example 2)
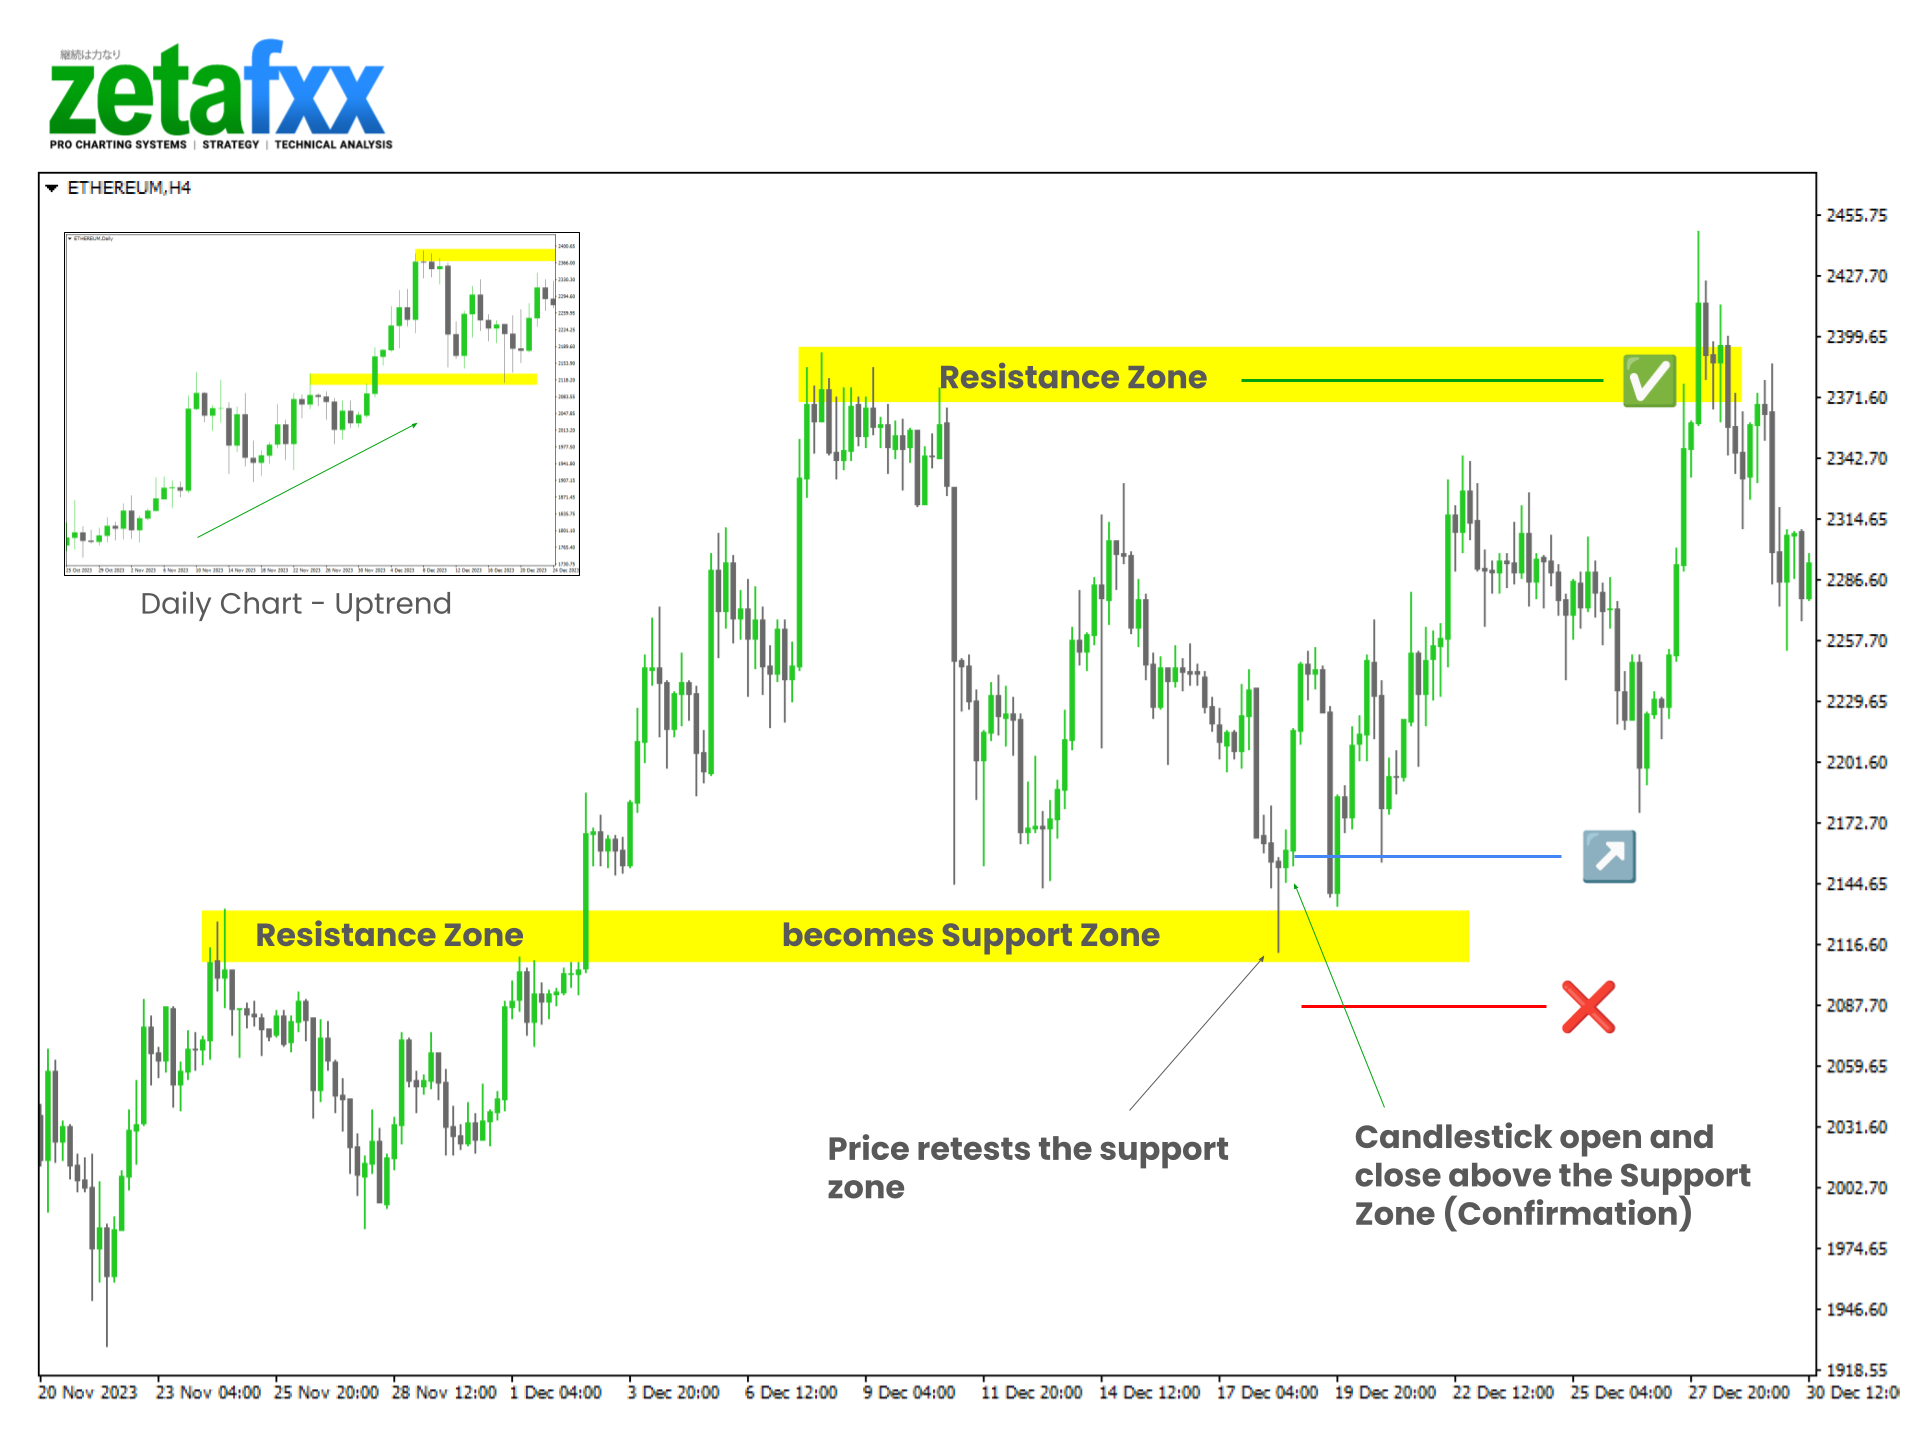
This Ethereum Buy Trade has the following factors to make this a successful trade:
- The overall uptrend is in line with the larger timeframe (daily chart)
- Confirmation Candle open and close above the support zone on the 18th of December
- Stop loss is placed under the support zone
- Take profit at the next major resistance level at 2372.
- It has more than a 1:2 risk-to-reward ratio; it’s around 1:4, making this a great opportunity.
- Price retested the support zone around 2116, and a confirmation candlestick was formed afterwards.
Let’s look at the next example.
GBP/USD Bullish Trend Support Buy with the Trend (Example 3)

This GBP/USD Buy Trade has the following factors to make this a successful trade:
- The overall uptrend is bullish and in line with the larger timeframe (daily chart)
- Confirmation Candle open and close above the support zone on the 14th of July
- Stop loss is placed under the support zone
- Take profit at the next major resistance level at 1.26625
- It has more than a 1:2 risk-to-reward ratio; it’s around 1:25
- Price retested the support zone around 1.25220, and a confirmation candlestick was formed afterwards (green arrow).
Bearish Examples Using Resistance Zones
Check out these Bullish Examples of Trading with Resistance Zones.
Glossary:
❌Stop Loss – where you would close the trade in a loss
↘️ Sell Entry Price – your sell position
✅ Take Profit – where you would take your profit.
Bitcoin Bearish Trend Resistance Sell with the Trend on the Daily Chart (Example 1)
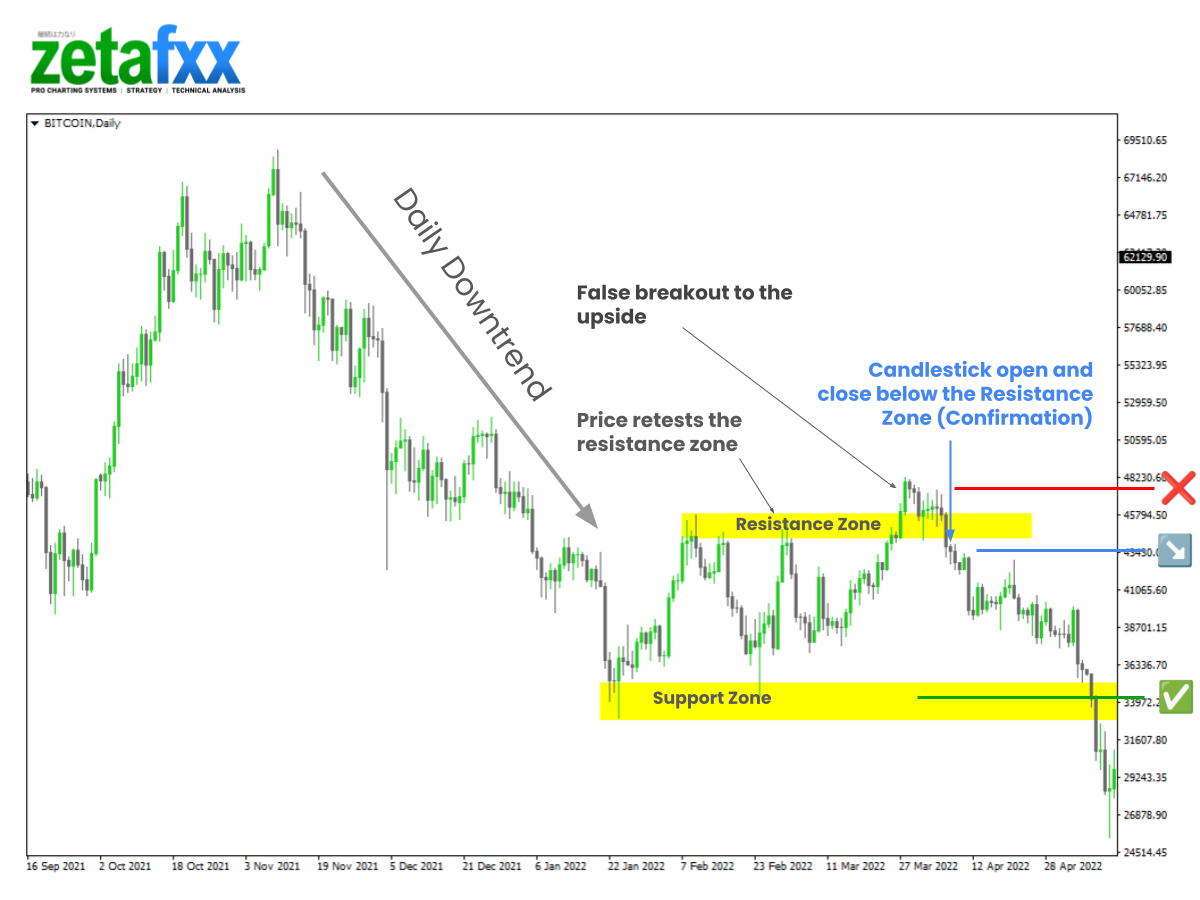
This Bitcoin Daily Chart Sell Trade has the following factors to make this a successful trade:
- The most recent daily trend is downtrending.
- Confirmation Candle opens and closes below the resistance zone on 1st April.
- Stop loss is placed above the resistance zone
- Take profit at the next major support level at around 33,972.
- It has more than a 1:2 risk-to-reward ratio.
- It had a false breakout to the upside from the resistance area but failed, breaking into a continuous sell-off and hitting the take-profit level.
AUD/USD Bearish Trend Resistance Sell with the Trend on the 4-Hour Chart (Example 2)
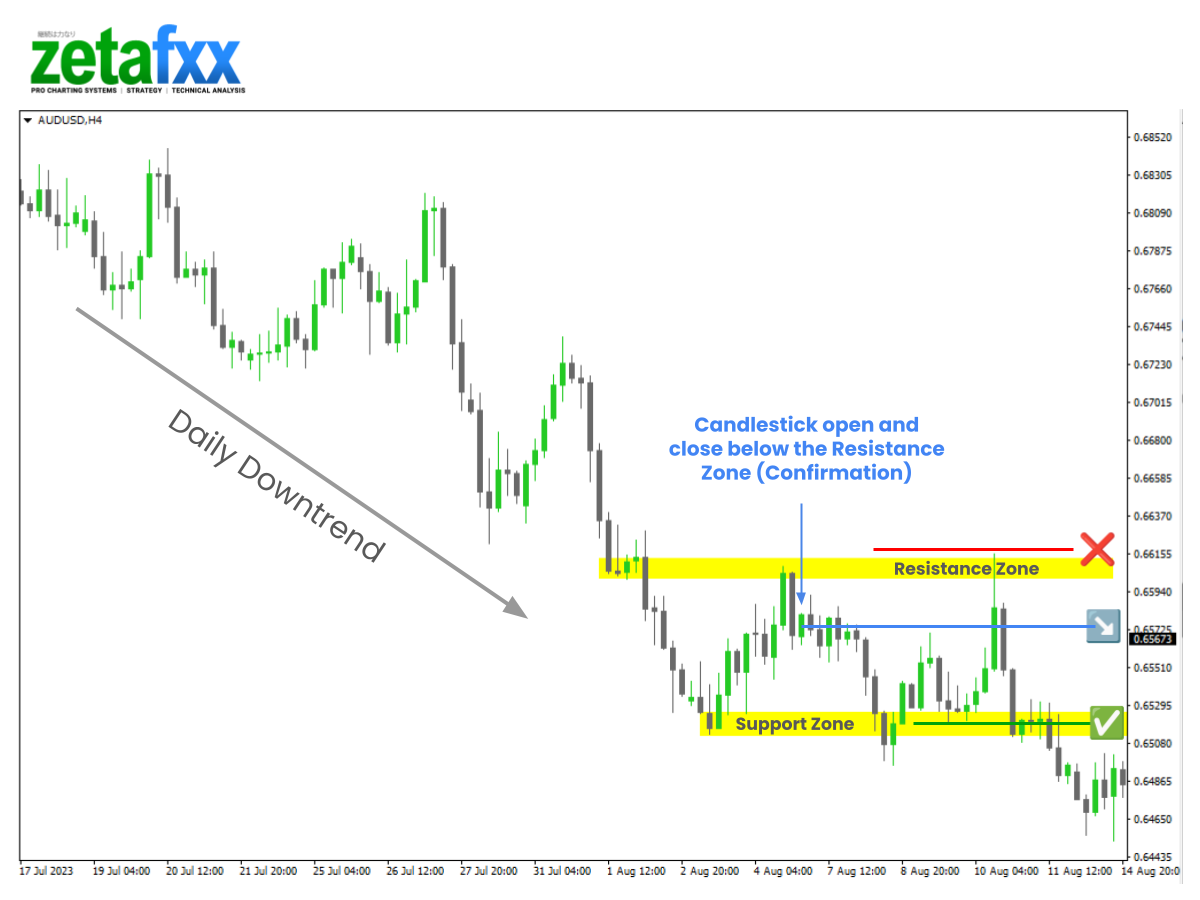
This AUDUSD 4-Hour Chart Sell Trade has the following factors to make this a successful trade:
- The most recent daily trend is a downtrend.
- Confirmation Candle opens and closes below the resistance zone around the 5th of April.
- Stop loss is placed above the resistance zone around 0.66155
- Take profit at the next major support level at around 065050
- While this didn’t have the ideal 1:2 (more like 1:1.6) risk-to-reward ratio, it was still quite a decent trade based on the overall trend
Gold Bearish Trend Resistance Sell with the Trend on the 1-Hour Chart (Example 3)

This Gold 1-Hour Chart Sell Trade from the resistance zone has the following factors..
- The higher timeframe (4H) was bearish.
- Confirmation Candle opens and closes below the resistance zone around the 1st of May.
- Stop loss is placed above the resistance zone around 2329
- Take profit at the next major support level at around 2283, which was taken out by a large bearish spike.
- Great Risk-to-reward ratio of 1:3!
Maximise your support and resistance zone trading strategy with others
While trading with the support and resistance zone may look somewhat simple, you would have higher odds of success if you included other factors like a Breakout or Fibonacci Retracement strategy.
Combining these factors is called confluence when two, three or more factors are used together!
Useful Resources
To gain familiarity, practice thoroughly without risk by practising at drawing both support and resistance zones for bullish and bearish scenarios.
You can use free charts on the following platforms to try out first.
Backtesting for Strategy Refinement
Once you’re comfortable with the breakout strategy, we highly recommend using a backtesting simulator like Forex Tester to fine-tune your approach.

Forex Tester is a great tool for testing your strategies in a risk-free environment. It uses extensive historical data to simulate real market conditions, helping you identify strengths and weaknesses. This allows you to adjust your strategy without risking real money.
Forex Tester enhances your learning curve and builds confidence, making it invaluable for beginners and experienced traders.
Forex Tester Features:
- Realistic Simulation: Mimics real market conditions using historical data.
- Extensive Historical Data: Access years of historical data to test different scenarios.
- Advanced Charting Tools: Utilize trendlines, indicators, and drawing tools for detailed analysis.
- Customizable Strategies: Create, test, and refine your trading strategies.
- Detailed Reporting: Generates comprehensive performance reports to identify strengths and weaknesses.
Benefits of Using Forex Tester:
- Risk-Free Practice: Perfect for refining strategies without risking real capital.
- Improved Strategy Development: Thorough backtesting helps understand strategy performance in various market conditions.
- Accelerated Learning Curve: Provides a controlled environment in which to learn and practice trading.
- Time Efficiency: Compress years of market data into a shorter period for quick, long-term strategy testing.
- Performance Analysis: Offers detailed metrics and reports to evaluate and improve strategies.
Final Thoughts
Mastering identifying support and resistance zones that frequently work in trade analysis requires dedication and practice. Tools like Forex Tester allow you to practice risk-free, refine your techniques, and build confidence before trading with real capital.
Combining theoretical knowledge with practical application through backtesting is crucial for developing a robust trading strategy. Stay committed, keep learning, and use these resources to enhance your trading journey. Success in trading comes with persistence, practice, and a willingness to learn from successes and mistakes. Happy trading!