
Understanding Bollinger Bands (BB): A Guide for Traders and Investors
Hey there, future trading superstar! Have you ever come across those neat lines hugging the ups and downs of a stock chart? Those are Bollinger Bands, and they’re pretty nifty when you’re trying to make sense of the market’s chaos. Whether you’re just getting your feet wet in trading or have been navigating the market waters for some time, understanding Bollinger Bands can give you an edge.
Table of Contents
So, what exactly are Bollinger Bands? They’re not named after an underground rock band, although that would be pretty cool, right? These bands are smart tools created by John Bollinger in the early 1980s. John was a finance whiz who wanted to make it easier for everyone to figure out when a stock was too high (overbought) or too low (oversold). And guess what? He did! Today, Bollinger Bands are like a Swiss Army knife for traders.
This article explains everything you need to know about Bollinger Bands. From understanding what they are and how they work to learning some awesome strategies, you’ll be ready to use this tool like a pro by the end.
Now, who’s this article for? I’m glad you asked! It’s a perfect read for new traders still getting the hang of things. But it’s also helpful for experienced investors looking to refine their strategies or anyone curious about technical analysis.
Ready to dive in? Let’s roll!
THE BASICS OF BOLLINGER BANDS
Alright, let’s explore the building blocks of Bollinger Bands. We’ll start with the core components and see how they combine to give us valuable insights into trading. We’ll break it down bit by bit so it’s easy to follow.
Components of Bollinger Bands
Bollinger Bands consist of three main parts:
Middle Band: This is the Simple Moving Average (SMA). Think of it as the baseline, a smooth line that follows the average price over a set period. Traders commonly use a 20-day SMA, but it can be adjusted based on preference.
Upper Band: This line is calculated by taking the SMA and adding a certain number of standard deviations. It’s like saying, “Let’s move up from our average by a bit to see how high prices typically go.”
Lower Band: Conversely, this one is found by subtracting that same number of standard deviations from the SMA. It helps us see how low prices usually dip.
So, you’ve got three lines that move along with the stock prices, showing the average plus or minus a range of deviations.
How Bollinger Bands Are Calculated
Now, how do we do the math for these bands? Don’t worry; it’s not as tricky as it sounds.
Simple Moving Average (SMA): The SMA means averaging the closing prices over a specific period. For example, if you’re looking at a 20-day SMA, you add up the closing prices for the last 20 days and divide by 20.
Standard Deviation: This part measures how spread out the prices are from the average. The standard deviation is high if the prices wildly swing up and down. If they don’t change much, it’s low.
Band Calculation: Typically, traders use 2 standard deviations above and below the SMA to set the lines. So, you’d have the Upper Band = SMA + (2 x standard deviation) and the Lower Band = SMA – (2 x standard deviation).
Visualizing Bollinger Bands
Let’s put these bands onto a stock chart to see their appearance.
Imagine a graph with time on the bottom and price on the side. You’ll see a wavy line (the SMA) tracking the overall trend, with the Upper and Lower Bands dancing above and below it. The area between these two lines forms a kind of envelope around the stock price. When the price fluctuates a lot, the bands widen. When the price is more stable, they get closer together.
For example, if you look at a stock chart of Apple Inc., you’ll see the SMA line in the middle, with the Upper and Lower Bands wrapping around it. It almost looks like a price tunnel that expands and contracts. This visual helps traders quickly spot when prices are high or low relative to the average, making it easier to predict movements.
And there you have it—the basics of Bollinger Bands. They might seem abstract initially, but once you see them in action on a chart, it all starts to click. Next, we’ll explore how to use these bands in your trading strategies. Stick around!
How to Use Bollinger Bands in Trading
Now that we’ve covered the basics let’s dive into the exciting part—how to use Bollinger Bands in your trading! This section will break down some nifty ways these bands can help you identify trends, develop trading strategies, and mix them with other indicators for a more rounded approach. Ready? Let’s get rolling.
Identifying Trends
First things first, trends are your best buds in trading. Bollinger Bands can be super helpful to spot whether a stock’s price is trending up or down. When the price consistently hugs the upper band, that usually means it’s in an uptrend. Conversely, if the price sticks close to the lower band, that’s a downtrend.
But it’s not just about hugging bands. Ever heard of the terms “squeeze” and “breakout”? The BB bands can show you periods of low volatility (squeeze) when the bands come close together. When this happens, it usually signals that a breakout—a sudden increase in volatility, either up or down—is just around the corner. Watch out for these moments; they could be prime trade opportunities!
Trading Strategies with Bollinger Bands
Okay, trends are cool, but let’s get more specific. Here are some solid strategies you can use with Bollinger Bands:
Bollinger Band Bounce
This is a straightforward yet effective strategy. Imagine the price bouncing between the upper and lower bands like a tennis ball. When the price hits the lower band, it’s often considered oversold and may be poised for a bounce back up towards the middle or even the upper band. Similarly, when the price hits the upper band, it might be overbought and ready to come down. Simple, right? Try to visualize it like a rubber band stretched too far on either side—it usually snaps back.
Bollinger Band Squeeze
Remember the “squeeze” we talked about earlier? This strategy focuses on those tight-band moments. When you see the bands getting close together, it signals that volatility is super low. Historically, this precedes a breakout. Use this time to prepare—you may not know which direction the breakout will go, but by having a plan, you can quickly act once it happens.
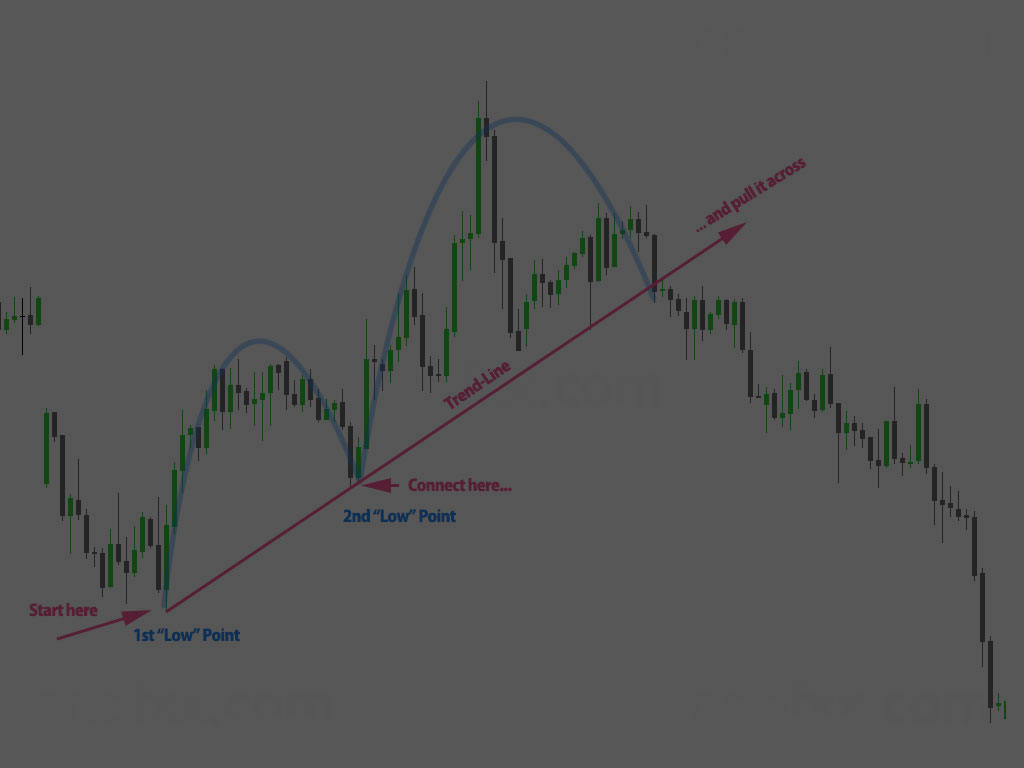
Double Bottom with Bollinger Bands
Here’s a slightly more advanced one. A double-bottom pattern signals a reversal from a downtrend to an uptrend. When the price makes a low, bounces, and then makes another low near the same level, that’s your double bottom. If these lows hit or cross the lower Bollinger Band and the second low is not as low as the first, it might be a great buying opportunity. Look for this pattern to jump into a rebounding market potentially.
Combining Bollinger Bands with Other Indicators
Bollinger Bands are great on their own, but mixing them up with other indicators can give you a clearer picture. Think of it like adding more tools to your toolbox.
Moving Averages
Adding a simple or exponential moving average can help confirm trends spotted with Bollinger Bands. If your moving average is trending up while the price is hugging the upper Bollinger Band, that’s a stronger uptrend signal.
Relative Strength Index (RSI)
The RSI is another useful tool. It measures the speed and change of price movements. Pairing RSI with Bollinger Bands can help you accurately catch overbought or oversold conditions. For example, if the price hits the upper band and the RSI indicates it has been overbought, it might be a good time to sell.
Volume Indicators
Volume can be the secret sauce. During a squeeze, if a significant increase in volume accompanies a breakout, it gives that move more credibility. Integrating volume indicators with your Bollinger Bands analysis can offer you extra insight into the strength or weakness of a price move.
And there you have it! A toolkit filled with ways to use Bollinger Bands in trading. It’s about observing trends, actively employing strategies, and mixing these bands with other indicators to enhance your trading prowess.
So, are you ready to test these out? The market awaits!
Tips and Common Mistakes
Tips for Effective Use of Bollinger Bands
Alright, let’s explore some handy tips for making the most of Bollinger Bands. First things first: always consider market conditions. Bollinger Bands work differently in trending markets than in ranging markets. Prices might continuously touch the upper or lower bands in a trending market. This is normal and not a sign to panic or make hasty decisions.
Another advice is to use Bollinger Bands as part of a broader strategy. Don’t just rely on them alone. Combine them with tools like the Relative Strength Index (RSI) or Moving Averages for a more comprehensive view. This ensures you’re considering various aspects before making a trading move.
And here’s a cool idea: practice with historical data. You can back-test your strategies to see how well Bollinger Bands would have worked in the past. This can boost your confidence and help you understand their behaviour in different scenarios.
Common Mistakes to Avoid
Even though Bollinger Bands are super useful, it’s easy to make mistakes if you’re not careful. One common error is relying too much on Bollinger Bands alone. They’re great, but ignoring other market signals can lead to missed opportunities or bad calls. Always consider other indicators and market conditions before making a decision.
Another major pitfall is misinterpreting the Squeeze and Breakout. When the bands squeeze together, it often signals that a big move is coming. However, it doesn’t tell you the direction. Traders sometimes jump the gun and guess the move’s direction instead of waiting for confirmation.
Lastly, don’t ignore other market signals. Volume, recent news, and economic data can provide crucial context for what you see on the charts. Make sure you’re considering all available information before making any trades.
Case Studies and Real-Life Examples
Learning from real-world examples can be super helpful. Let’s discuss a few cases where Bollinger Bands played a crucial role. In one successful trade, a trader noticed a strong squeeze followed by a breakout. They capitalised on a significant upward move by combining this signal with RSI and volume indicators. This nicely highlighted the importance of using Bollinger Bands with other tools.
On the flip side, there are lessons to be learned from failed trades. For instance, another trader relied solely on Bollinger Bands and ignored upcoming earnings reports. The result? The stock didn’t move as expected, and the trade flopped. This underlines why it’s vital to consider external factors.
When you look at different market conditions, it’s clear that Bollinger Bands can behave uniquely. In a volatile market, the bands widen, which could either warn you of increased risk or offer bigger opportunities. Awareness of these nuances can make a big difference in your trading success.
There you have it! These tips, common pitfalls, and real-life examples should set you on a solid path to effectively using Bollinger Bands in your trading strategy. Happy trading!
Conclusion
Alright, you’ve made it to the end! Let’s quickly recap what we’ve covered about Bollinger Bands.
First, Bollinger Bands help you understand stock price volatility. John Bollinger created them as an essential tool for new traders and seasoned investors looking to sharpen their technical analysis skills.
We explored the nuts and bolts of Bollinger Bands, the Simple Moving Average (SMA) that forms the middle, upper, and lower bands determined using standard deviations. We also showed you how to visualize these bands on stock charts, making the concept easier to grasp.
Regarding using Bollinger Bands in trading, we explored key strategies, such as identifying trends, spotting squeezes and breakouts, and combining Bollinger Bands with other indicators like RSI and moving averages. If applied correctly, these strategies can seriously up your trading game.
We didn’t stop there—we gave you a heads-up on common pitfalls, like over-reliance on Bollinger Bands or ignoring other market signals. Remember, these bands should be part of a broader strategy rather than the sole indicator you depend on.
Finally, we threw in some real-life case studies to show you the ropes, highlighting successful trades and learning opportunities from the ones that didn’t go as planned.
The key takeaway? Practice makes perfect. Don’t rush; take the time to analyse historical data and see how Bollinger Bands react in different market conditions. And hey, don’t forget, you’ve got a treasure trove of resources and FAQs on our website, and we are just waiting for you to explore.
Happy trading, and may your charts ever be in your favour!
FAQ: Understanding Bollinger Bands (BB)
What Are Bollinger Bands?
Q: What exactly are Bollinger Bands?
A: John Bollinger created Bollinger Bands, a popular tool in technical analysis. They measure market volatility and identify potential overbought or oversold conditions.
Q: Why are Bollinger Bands important in trading?
A: They’re crucial because they help traders see price trends, assess volatility, and make more informed trading decisions based on the price movement within the bands.
Who Should Read This?
Q: Is this guide for beginners?
A: Absolutely! New traders, experienced investors, and anyone curious about technical analysis will find valuable insights here.
The Basics of Bollinger Bands
Q: What are the main parts of Bollinger Bands?
A: Bollinger Bands consist of three lines: the Middle Band (a Simple Moving Average), the Upper Band (SMA plus a certain number of standard deviations), and the Lower Band (SMA minus a certain number of standard deviations).
Q: How do you calculate Bollinger Bands?
A: Start with a Simple Moving Average (SMA) for a set period like 20 days. Then, add/subtract a multiple (usually 2) of the standard deviation to/from this average to create the upper and lower bands.
Q: How do they look on a stock chart?
A: Visually, Bollinger Bands form a channel around the price action on a chart, with the upper and lower bands expanding and contracting based on market volatility.
Using Bollinger Bands in Trading
Q: Can Bollinger Bands help identify trends?
A: Yes, they can. Uptrends are indicated when prices consistently touch the upper band, while downtrends are shown when prices repeatedly hit the lower band. A “squeeze” suggests the stock is consolidating and may break out soon.
Q: What is a Bollinger Band Bounce?
A: The Bollinger Band Bounce is a strategy where prices bounce between the upper and lower bands. For example, if the price hits the lower band, it might be a signal to buy, expecting the price to rise toward the middle or upper band.
Q: What is a Bollinger Band Squeeze?
A: A Squeeze happens when the bands come close together, indicating low volatility and a potential breakout. Traders watch for the price to move strongly in one direction as the squeeze resolves.
Combining with Other Indicators
Q: Should Bollinger Bands be used with other indicators?
A: Definitely! They work great with tools like Moving Averages, Relative Strength Index (RSI), and volume indicators to confirm trends and signals.
Tips and Common Mistakes
Q: Any tips for using Bollinger Bands effectively?
A: Yes, always be aware of market conditions, use Bollinger Bands as part of a broader strategy, and practice with historical data to fine-tune your approach.
Q: What common mistakes should I avoid?
A: Don’t rely solely on Bollinger Bands—consider other market signals too. Also, be careful not to misinterpret the Squeeze and Breakout.
Case Studies and Examples
Q: Can you share some real-life examples of Bollinger Bands in action?
A: Sure! We’ll look at successful trades and lessons from failed trades to highlight what works and what doesn’t in different market conditions.
Conclusion
Q: Can you recap the key points?
A: Bollinger Bands help measure volatility and identify price trends. They should be used with other indicators and within a broader strategy. Remember to practice and continuously learn.
Thanks for exploring Bollinger Bands with us! Check out more resources and FAQs on our website for deeper dives and updates.
Helpful Links and Resources
Exploring Bollinger Bands in depth requires continuous learning and practice. Here, we’ve compiled some essential resources to enhance further your understanding and application of Bollinger Bands in trading.
Recommended Articles:
- Using Bollinger Bands to Gauge Trends – Investopedia: An informative article detailing how Bollinger Bands can identify trade entry and exit points.
- Bollinger Bands: What They Are, and What They Tell Investors – Investopedia: A comprehensive explanation of Bollinger Bands, from their creation to their practical use.
- Bollinger Bands (BB) | TradingView: Insight into the foundational aspects of Bollinger Bands and their visual application on charts.
Additional Guides:
- Bollinger Band Width and %B: An Overview: Understand the nuances of Bollinger Band Width and how %B can enhance trading decisions.
- Bollinger Bands Explained: Formula & Trading Strategies – Britannica: Delve into the mathematics behind Bollinger Bands and explore various trading strategies.
Tools and Platforms:
- Bollinger Bands Trading Strategy – PowerOptions: Discover practical strategies for using Bollinger Bands with options trading.
- Bollinger Bands on TradingView: See how Bollinger Bands are implemented and visualized on TradingView’s charting platform.
By exploring these resources, you will better understand Bollinger Bands and how to incorporate them into your trading strategies effectively. Remember, the key to mastery is continuous practice and staying informed about market dynamics.
Happy Trading!
« Back to Glossary Index